Configure Twilio SendGrid SMTP for Seamless Email Delivery
Ensure your emails are delivered quickly and securely with Twilio SendGrid. Integrate it with Pro Mail SMTP to enhance your email communications.
INTEGRATE SENDGRID FOR FREE
How to Integrate Pro Mail SMTP with Twilio SendGrid for Reliable Email Delivery
Twilio SendGrid offers a robust email delivery service designed to ensure that your messages reach their intended recipients quickly and reliably. With its advanced infrastructure, Twilio SendGrid specializes in transactional email delivery, making it an ideal choice for businesses that rely on timely communication with their users. By integrating Twilio SendGrid with Pro Mail SMTP, you can significantly enhance your email communication strategy, ensuring that your emails are not only delivered but also engage your audience effectively.
This comprehensive guide will walk you through the essential steps to set up Twilio SendGrid with Pro Mail SMTP. You will learn how to configure your account, generate the necessary API key, and properly set up your email settings. By following these instructions, you’ll be equipped to fully leverage Twilio SendGrid’s powerful features, improving your overall email deliverability and user engagement.
What is Twilio SendGrid?
Twilio SendGrid is a leading email service provider that specializes in both transactional and marketing email delivery. Designed for high volume and reliability, Twilio SendGrid ensures that your emails reach their intended recipients quickly and efficiently. With its user-friendly API, businesses can easily integrate Twilio SendGrid into their applications, making it a seamless solution for managing email communications.
One of the standout features of Twilio SendGrid is its focus on high deliverability rates, which helps reduce the chances of emails landing in spam folders. This is particularly important for businesses that rely on timely communication with their customers, such as password resets, order confirmations, and promotional emails.
Key Features:
Cost: Twilio SendGrid offers a free plan that allows you to send up to 100 emails per day, which is great for testing and small projects. For higher volumes, you can choose from a range of paid plans.
From Email Requirements: while Twilio SendGrid can work with various From Email addresses, it is recommended to use a domain-specific address (e.g., info@example.com) for optimal deliverability.
Bottom Line: known for its reliability and scalability, Twilio SendGrid is a strong option for businesses aiming to enhance their email delivery while managing large volumes of email traffic.
Step 1: Create a Twilio SendGrid Account
To integrate Pro Mail SMTP with Twilio SendGrid, you first need to create an account.
Creating a Twilio SendGrid Account
If you haven’t signed up for Postmark yet, here’s how to create your account:
- Visit the Twilio SendGrid Website.
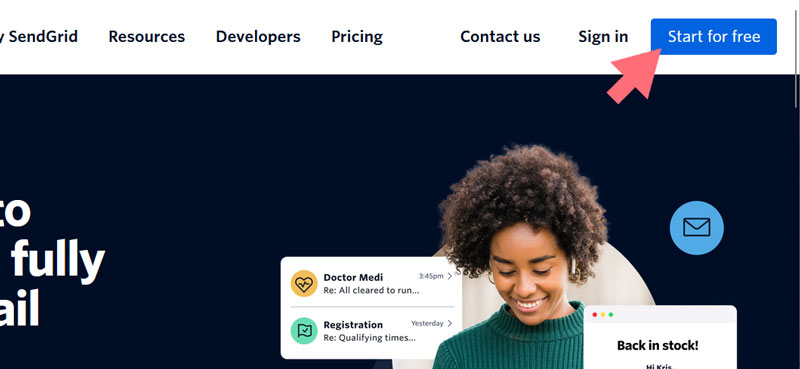
Go to SendGrid.com. - Sign Up for an Account.
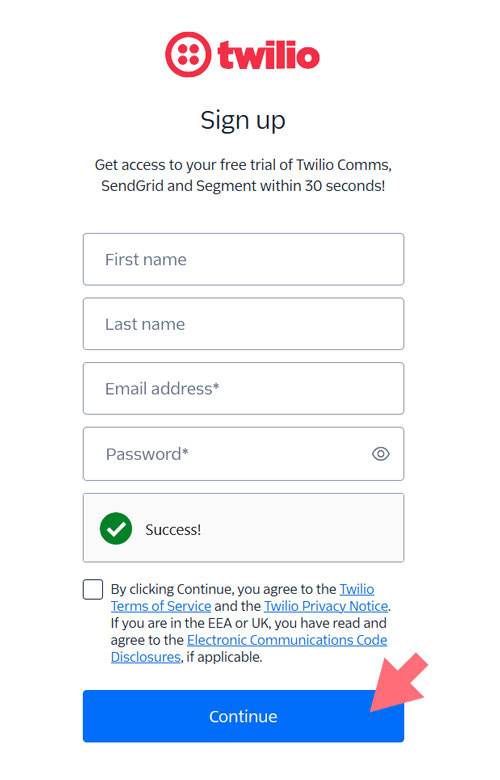
Click on the Start For Free button and complete the registration form with your details.
- Verify Your Email Address.
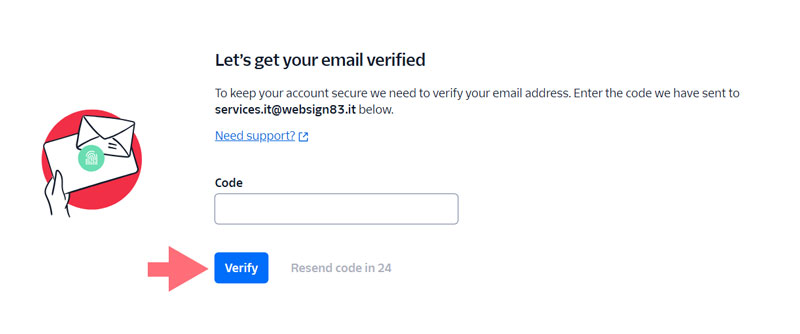
After submitting the form, you will be redirected to a page where you need to enter a verification code. This code will be sent to the email address you provided during registration.
Check your email for the verification code, enter it on the verification page, and proceed.
- Verify Your Phone Number.
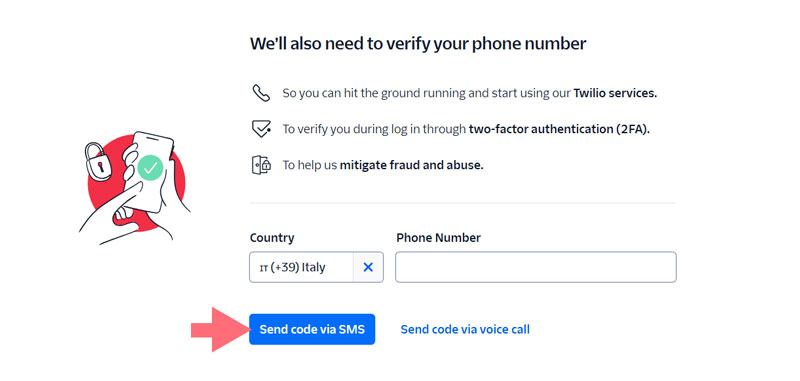
Once your email is verified, you will be directed to a page where you need to verify your phone number. Enter your phone number and follow the prompts to receive a verification code via SMS.
Enter the code you receive to complete the phone verification process.
- Log In to Your Dashboard.
Once your email is verified, log in to your Twilio SendGrid account to access the dashboard.
Step 2: Create Your Sender Identity
To start sending emails with Twilio SendGrid, you need to set up a sender identity. There are two options available: creating a single sender identity or authenticating your domain. While both methods allow you to send emails, we recommend authenticating your domain for better deliverability and reputation management.
Adding a Single Sender to Your Twilio SendGrid Account
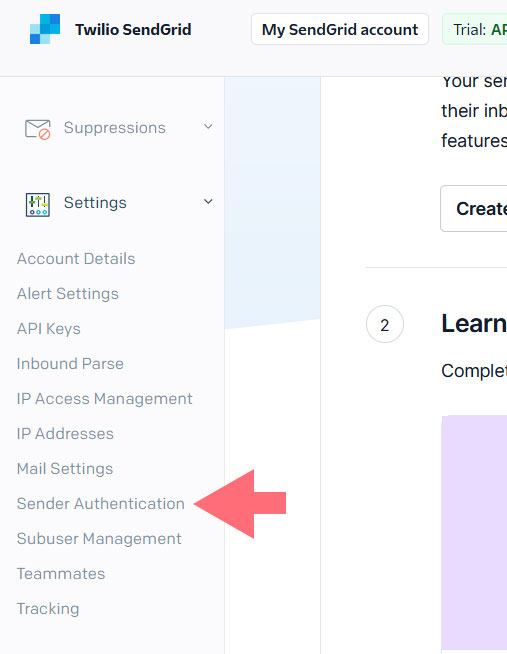
- Navigate to Sender Authentication.
In your Twilio SendGrid dashboard, click on Settings and then select Sender Authentication from the menu.
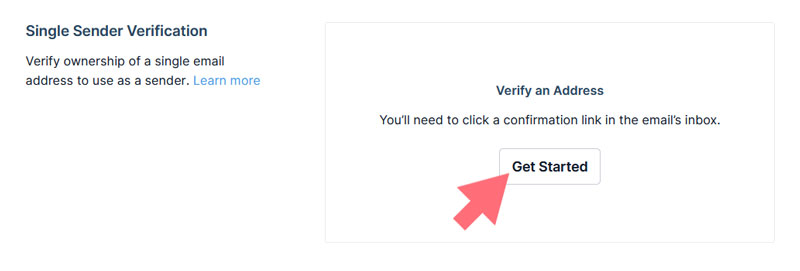
- Add a New Sender.
In the Single Sender Verification section, click the Get Started button.
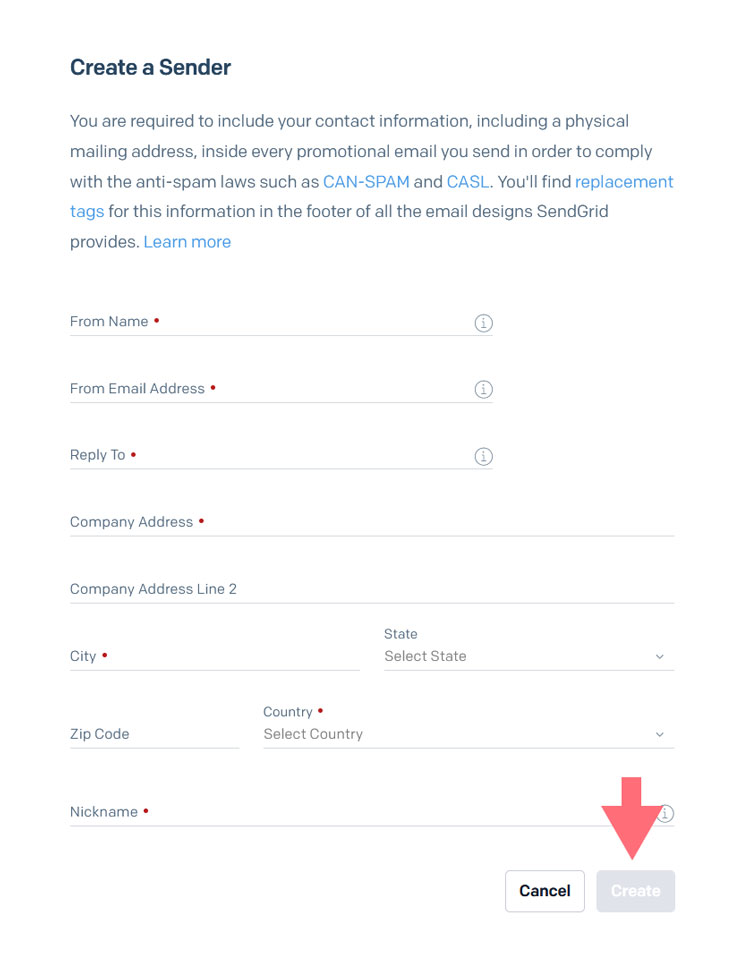
- Fill in the Required Information.
You will be prompted to enter the sender’s name, email address, and physical mailing address. Complete the form and click the Create button.
- Verify Your Sender Identity.
A confirmation email will be sent to the address you provided. Open the email and click the link to verify your sender identity.
Authenticating Your Domain in Twilio SendGrid
Authenticating your domain is crucial for ensuring that your emails are recognized as legitimate. This process helps improve deliverability and removes the “via sendgrid.net” message from your emails.
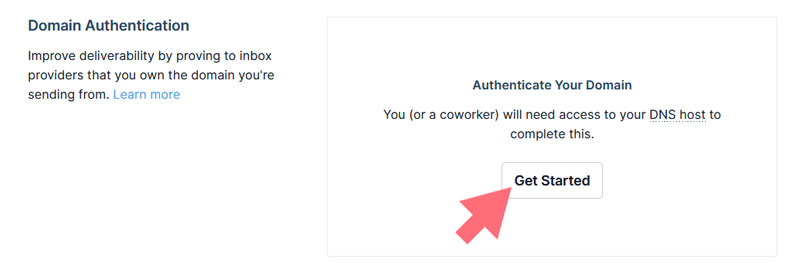
- Start Domain Authentication.
In the Twilio SendGrid dashboard, go to Sender Authentication and click on the Get Started button under the Domain Authentication section.
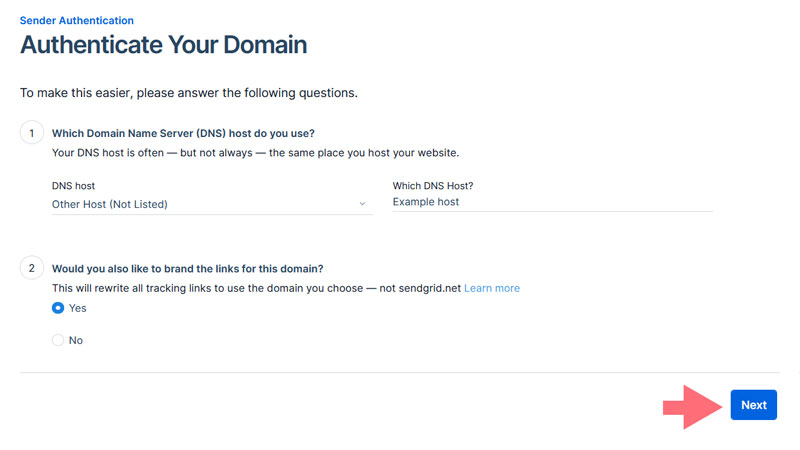
- Select Your DNS Host.
Choose your Domain Name Server (DNS) host from the list. If you don’t see your provider, select Other Host (Not Listed). - Brand Your Links.
You will be asked if you want to brand the links for your domain. It’s recommended to select Yes to have all links in your emails use your own domain.
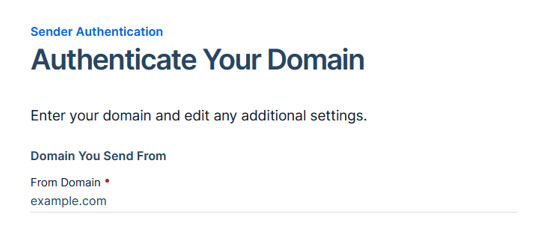
- Enter Your Domain.
Input the domain you want to authenticate (e.g., example.com). If you prefer, you can also use a subdomain like mail.example.com.
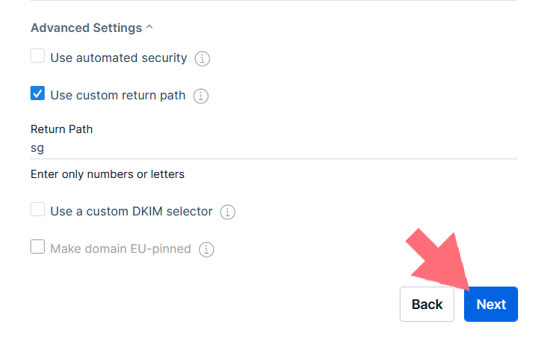
- Adjust Advanced Settings.
Click on Advanced Settings and make the following adjustments:- Uncheck the box labeled Use automated security.
- Check the box labeled Use custom return path and add a subdomain in the Return Path field.
In this case, the subdomain will be exclusively used by Twilio SendGrid for sending emails and will not be visible on your website. If you don’t have a specific subdomain in mind, using sg is a common practice.
💡Important Note
The subdomain can be any name you choose, but Twilio SendGrid advises against using “mail” since many hosting providers already utilize this subdomain, which could lead to conflicts. Additionally, avoid using underscores (_) as they may not be supported by some DNS providers.
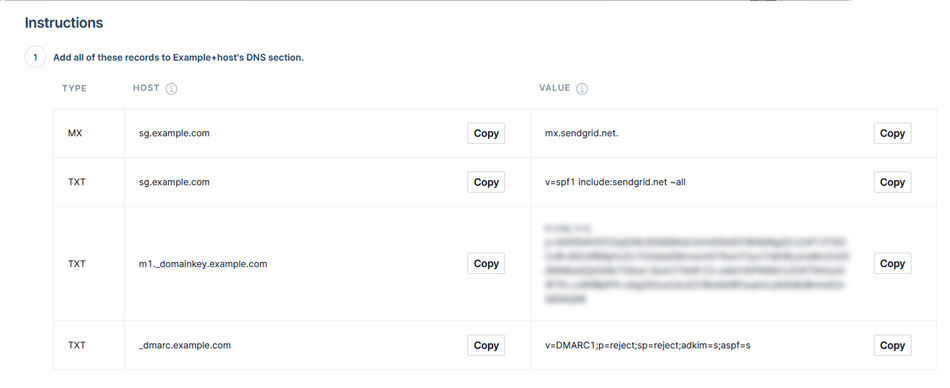
- Add DNS Records.
Twilio SendGrid will provide you with specific DNS records (TXT and CNAME) that you need to add to your domain’s DNS settings. Keep this page open while you make the necessary changes.
- Access Your DNS Settings.
Log in to your domain registrar or hosting provider’s control panel to access your DNS settings. If you’re unsure how to find these settings, consult your provider’s documentation or support resources. - Add the Required Records.
You will need to add the provided TXT and MX records to your DNS settings. Carefully copy the exact values from your Twilio SendGrid account, as accuracy is essential for successful verification. - Hostname Adjustments.
If your domain is managed by a specific provider, you may need to adjust the Hostname when entering the records. For example, instead of entering sg.example.com for the TXT record’s Hostname, you would only enter sg. - Setting the TTL.
You may see a TTL (Time To Live) field for the records in your DNS settings. If possible, set the TTL to one day (or 86400 seconds) to optimize caching. - Confirm Record Addition.
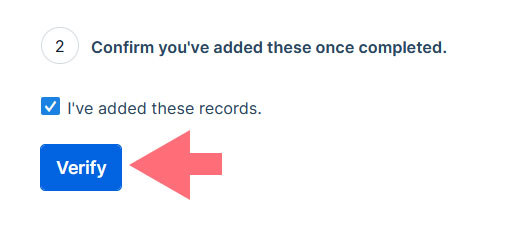
After adding all the required DNS records, return to your Twilio SendGrid dashboard and check the box labeled I have added these records. Then, click the Verify button.
- Monitoring the Verification Status.
It can take up to 48 hours for DNS changes to propagate. If the verification does not succeed immediately, be patient and try again later. You can continue with the setup process for Pro Mail SMTP while waiting for verification.
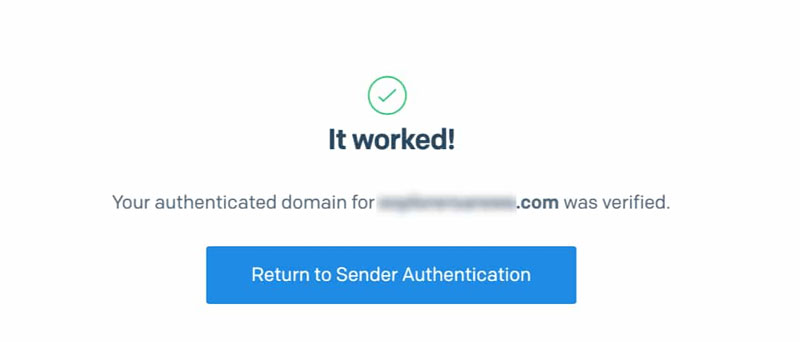
Once your domain is successfully verified, you will see confirmation messages indicating that your domain is ready for sending emails.
Step 3: Generate Your Twilio SendGrid API Key.
To successfully connect Pro Mail SMTP with Twilio SendGrid, you will need to generate an API key. This key allows Pro Mail SMTP to authenticate your requests to Twilio SendGrid’s email delivery service, ensuring that your emails are sent securely and efficiently.
Generating an API Key
- Log In to Your Twilio SendGrid Account.
Access your Twilio SendGrid dashboard by logging in with your credentials. - Navigate to Email API Integration.
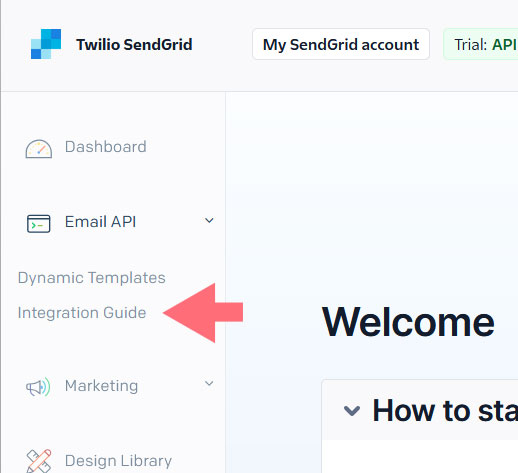
In the left menu, click on Email API and then select Integration Guide.
- Choose the Setup Method.
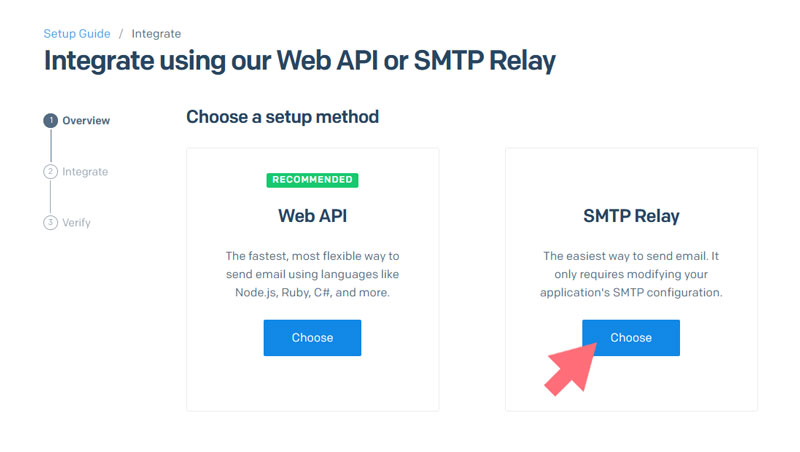
You will be prompted to select a setup method. Click the Choose button under the SMTP Relay option.
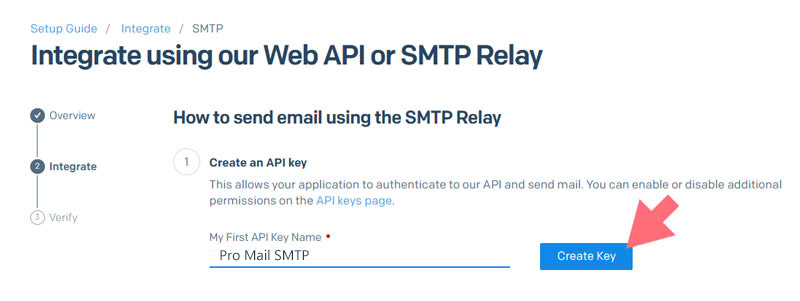
- Create Your API Key.
Enter a name for your API key (e.g., “Pro Mail SMTP Integration”) and click the Create Key button.
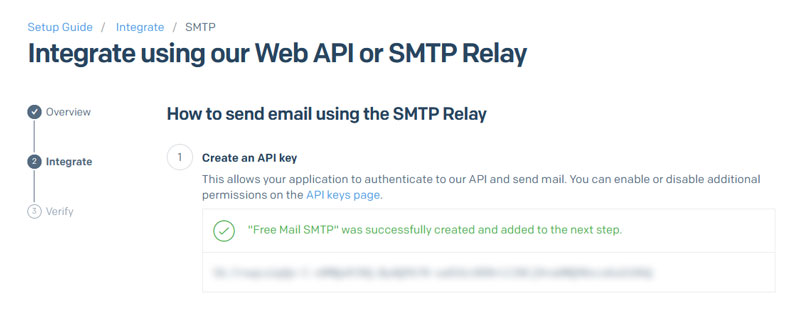
- Copy Your API Key.
Once the key is generated, make sure to copy it immediately. Keep this page open, as you will need to use this API key in the Pro Mail SMTP configuration.
💡Important Note
Be sure to store your API key securely, as it will only be displayed once. If you lose it, you will need to generate a new one by repeating the above steps.
Step 4: Configure Pro Mail SMTP.
Now that you have set up your Twilio SendGrid account, it’s time to configure Pro Mail SMTP to use Twilio SendGrid for sending emails. Follow these steps to complete the setup:
Install Pro Mail SMTP Plugin.
- Log in to Your WordPress Admin Area.
Access your WordPress dashboard. - Navigate to Plugin Installation.
Go to Plugins → Add New. - Search for Pro Mail SMTP.
In the search bar, type Pro Mail SMTP. - Install the Plugin.
Click on the Install Now button next to the plugin, and then activate it once the installation is complete. Alternatively, you can download Pro Mail SMTP directly from here.
Open the Plugin Settings.
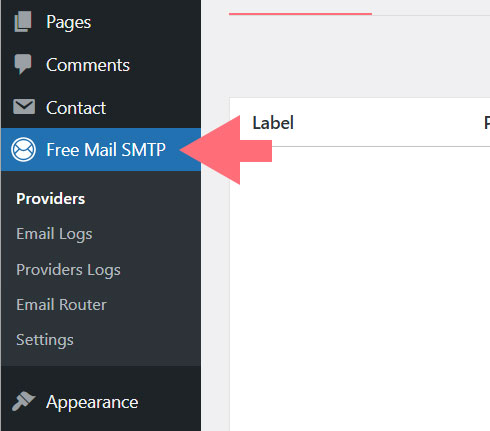
- Access Pro Mail SMTP Settings.
Once activated, find Pro Mail SMTP in the left-hand menu and click on it to access the settings.
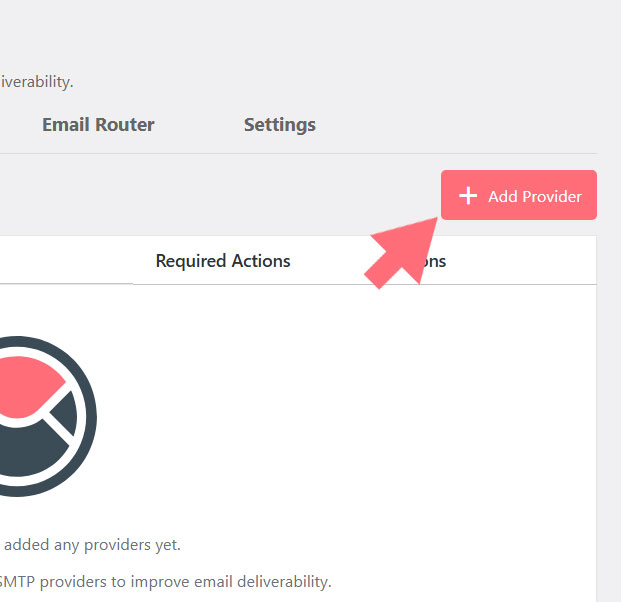
- Select Twilio SendGrid as Your SMTP Provider.
Click on the Add Provider button.
From the list of available SMTP providers, select Twilio SendGrid.
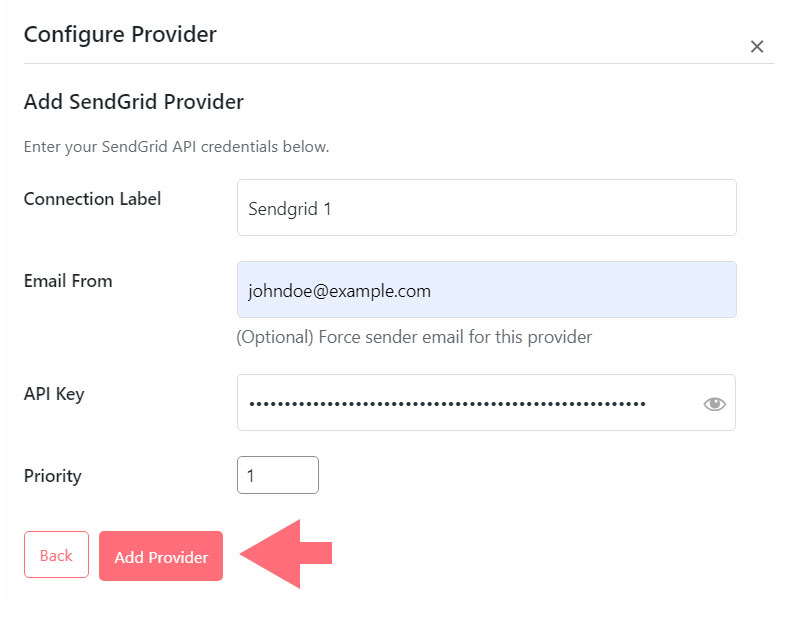
Enter SMTP Configuration Details.
- Connection Label.
Assign a unique name to this connection for easy identification (e.g., “Twilio SendGrid Connection”). This is helpful when managing multiple SMTP setups. - Email From (optional).
Specify the email address you wish to use for sending emails (e.g., noreply@example.com). This address can override the global email settings for the selected provider.
💡Tip
For better email deliverability, it is recommended to use a domain-specific email address (e.g., info@example.com) that matches the domain verified in your Twilio SendGrid account.
- API Key.
Paste the Twilio SendGrid API key you generated earlier into this field. This key is essential for authenticating your connection with Twilio SendGrid. - Priority.
Assign a priority number to this connection. Lower numbers indicate higher priority, which helps determine the order in which connections are used for sending emails.
Step 5: Save Your Settings and Run a Test.
Once you’ve entered all the required details, click Save Settings to apply the configuration.
Next, find the Test button in the provider settings section of the Pro Mail SMTP plugin.

If everything works correctly, your integration with Twilio SendGrid is complete!
Frequently Asked Questions about Twilio SendGrid Integration.
How do I integrate Twilio SendGrid with WordPress using Pro Mail SMTP?
To integrate Twilio SendGrid with WordPress, install the Pro Mail SMTP plugin, select Twilio SendGrid as your SMTP provider, and enter your API key and domain settings. This ensures secure and reliable email delivery for your website.
How do I set up Twilio SendGrid SMTP on WordPress for better email delivery?
The best way to set up Twilio SendGrid SMTP on WordPress is by using a trusted plugin like Pro Mail SMTP. Start by authenticating your domain in your Twilio SendGrid account, then create an API key. In WordPress, install the Pro Mail SMTP plugin, choose Twilio SendGrid as your provider, and enter your API key and sender details. This setup ensures your emails are authenticated and have a higher chance of reaching inboxes instead of spam folders.
Why use Twilio SendGrid for transactional emails?
Twilio SendGrid is optimized for high-volume transactional emails like password resets, order confirmations, and account notifications. Its strong deliverability and analytics make it a top choice for businesses that rely on timely user communication.
Do I need to authenticate my domain with Twilio SendGrid?
Yes, authenticating your domain with Twilio SendGrid is strongly recommended. It improves deliverability, builds sender reputation, and removes the “via sendgrid.net” label from your emails.
Where do I find my Twilio SendGrid API key?
You can generate your API key in the Twilio SendGrid dashboard under Email API → Integration Guide → SMTP Relay. Make sure to copy it immediately, as it will only be shown once.
What email address should I use when sending with Twilio SendGrid?
For best deliverability, use a domain-based email address (e.g., info@yourdomain.com) that matches the domain you verified with Twilio SendGrid. Avoid generic free email addresses like Gmail or Yahoo.
What DNS records are required for Twilio SendGrid domain authentication?
Twilio SendGrid provides you with TXT and CNAME records to add to your DNS. These records verify your domain and are essential for successful email delivery. Always double-check values and allow time for DNS propagation.
Is Twilio SendGrid free to use for small email volumes?
Yes, Twilio SendGrid offers a free plan that allows up to 100 emails per day, making it suitable for testing or small websites. For higher volumes, you can upgrade to a paid plan.
How long does it take to verify a domain with Twilio SendGrid?
Domain verification via DNS can take anywhere from a few minutes to 48 hours, depending on your DNS provider. You can proceed with plugin setup while waiting for verification to complete.
Can I use multiple SMTP providers with Pro Mail SMTP?
Yes, Pro Mail SMTP supports multiple connections. You can assign priority levels to determine which provider to use first, which is helpful for fallback strategies or specialized use cases.