Optimize Email Delivery with Pro Mail SMTP and Gmail
Ensure your emails are delivered successfully by integrating Pro Mail SMTP with your Gmail account. Enhance your deliverability and ensure your communications reach the intended recipients every time.
INTEGRATE GMAIL FOR FREE
How to Set Up Pro Mail SMTP with Gmail for Effective Email Delivery
Pro Mail SMTP provides the ability to use your Gmail or Google Workspace account to send emails from your WordPress site. This integration leverages Google’s API to securely authenticate your site’s emails, helping to resolve delivery issues and ensuring that your emails successfully arrive in your users’ inboxes.
By utilizing Pro Mail SMTP with Gmail, you can significantly enhance your email deliverability, reduce the risk of emails being marked as spam, and improve overall engagement with your audience. This setup is particularly beneficial for businesses and individuals who rely on email communication for transactions, notifications, and marketing campaigns.
By the end of this guide, you will have a fully operational email setup that maximizes your sending capabilities and improves your overall email performance.
What is Gmail?
Gmail is a widely used email service developed by Google, offering both free and paid options through Google Workspace (formerly G Suite). With its user-friendly interface, powerful spam filtering, and robust security features, Gmail has become a preferred choice for both personal and business email communications. It allows users to send and receive emails, manage contacts, and organize messages using labels and folders. Gmail also integrates seamlessly with other Google services, such as Google Drive, Google Calendar, and Google Docs, making it a versatile tool for productivity and collaboration.
Key Features:
Cost: Gmail offers a free plan that provides users with 15 GB of storage shared across Gmail, Google Drive, and Google Photos. For businesses and organizations seeking additional features, Google Workspace plans are available starting at a monthly fee per user.
From Email Requirements: when using Gmail with Pro Mail SMTP, it is recommended to use a domain-specific email address (e.g., info@yourdomain.com) for sending emails. This practice helps ensure that your emails are recognized as trustworthy by recipient servers, reducing the likelihood of being flagged as spam.
Bottom Line: integrating Pro Mail SMTP with Gmail provides a reliable and efficient solution for sending emails from your WordPress site. With its high deliverability rates, secure authentication, and user-friendly setup, this combination is ideal for businesses and individuals looking to optimize their email communications.
Step 1: Creating a Web Application in Your Google Account
To set up the integration, you’ll need to create a web application in your Google account. Open a new tab or window in your browser to get started.
- Log in to Your Google Account.
In the new tab, access your Google account and navigate to the Google Cloud Console.
💡Note
Ensure you are signed out of any other Google accounts that you won’t be using for this SMTP setup. If you are using Google Workspace, make sure that the account you log in with has the necessary permissions to send emails.
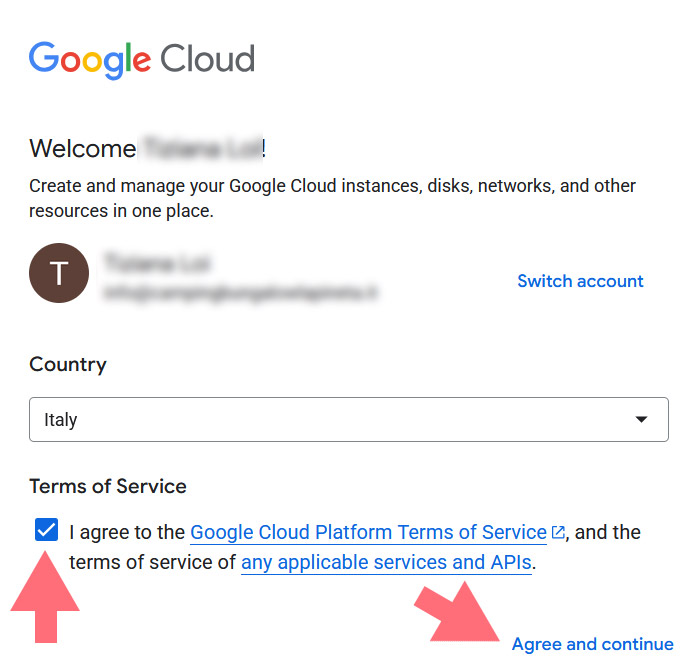
- Accept Terms of Service.
If this is your first time using the Google Cloud Console, a pop-up may prompt you to select your country and accept the Terms of Service. Click on AGREE AND CONTINUE to proceed.
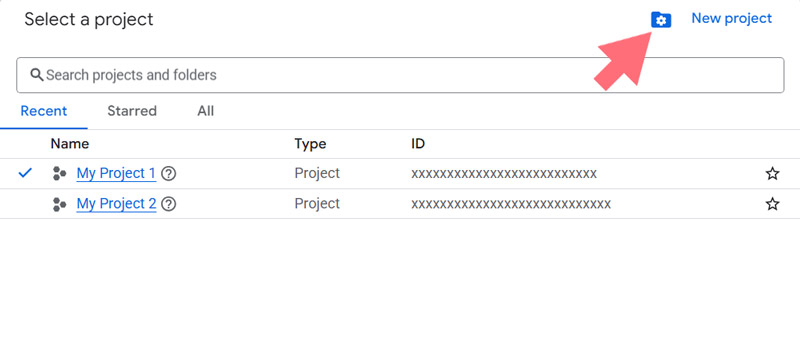
- Select or Create a Project.
Click on the My project dropdown in the toolbar at the top of the dashboard. From the pop-up, you can either select an existing project or click on New Project in the top right corner to create a new one.
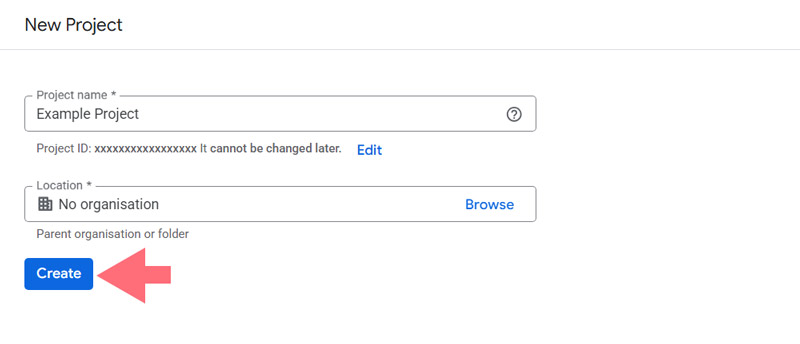
For a new project, enter a name, select an organization, and choose a location from the dropdown menus, then click CREATE.
- Enable the Gmail API.
In the sidebar, navigate to APIs & Services → Library.
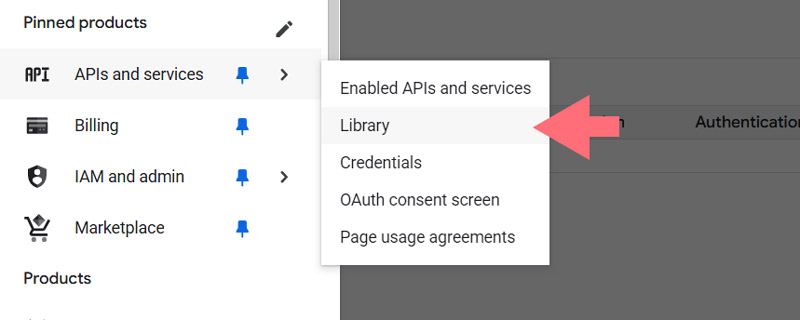
If you don’t see this option, scroll down to find MORE PRODUCTS. Search for “Gmail API” or look under the Google Workspace category, then select the Gmail API.
Click the ENABLE button on the Gmail API page.
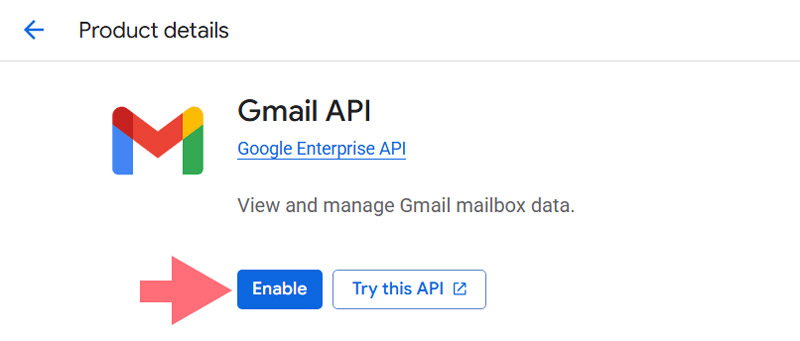
- Create Application Credentials.
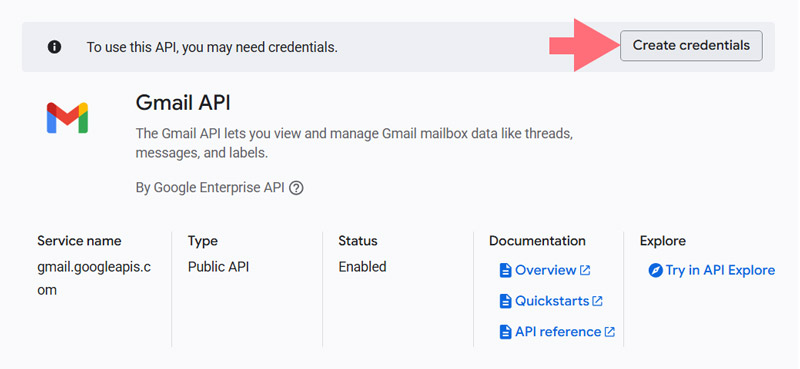
After enabling the Gmail API, you will be redirected to the Gmail API Overview page. Click on the CREATE CREDENTIALS button.
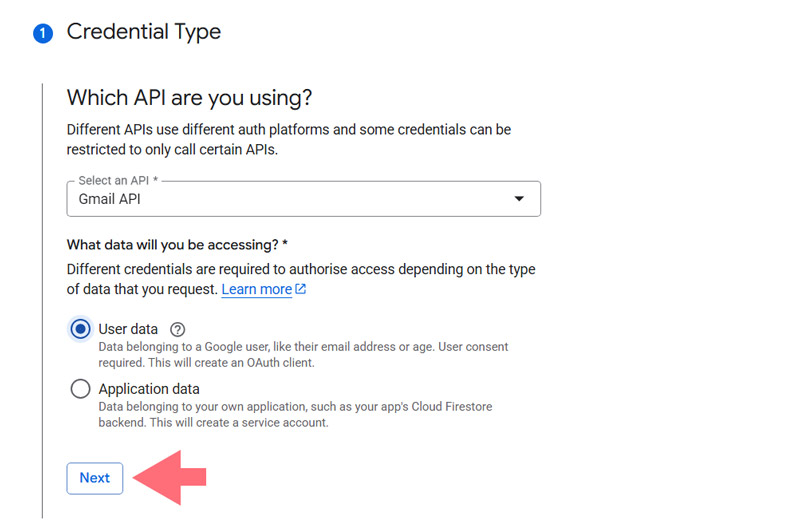
Choose Gmail API from the dropdown under Select an API and select User data for the type of data you will be accessing. Click NEXT to continue.
Step 2: Configure Your OAuth Consent Screen
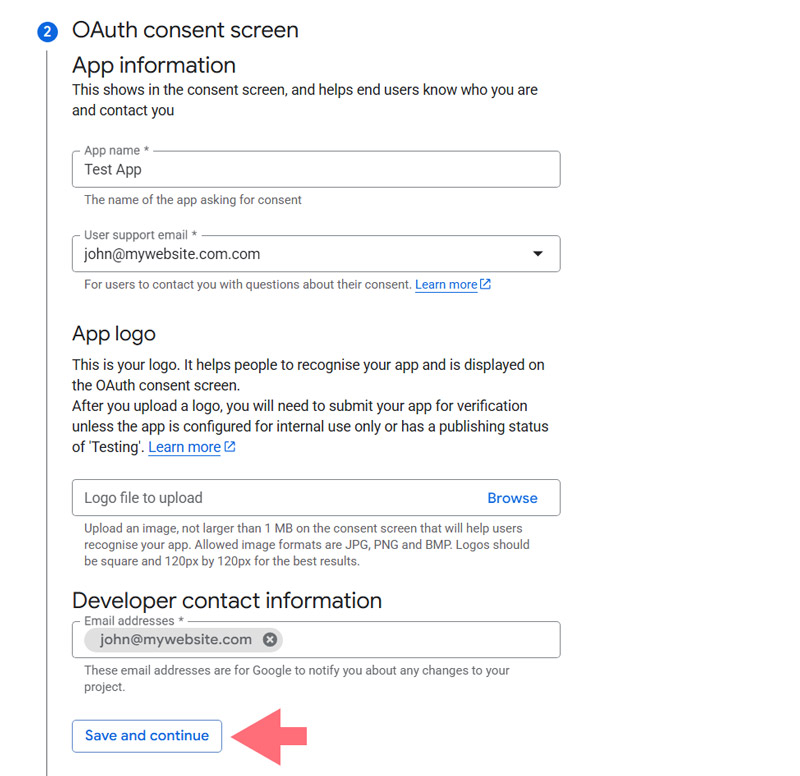
You will need to provide some basic information about your application. This is mainly for personal use, so you can fill in the required fields:
- App Name: choose a name for your app (e.g., “My Gmail Integration”).
- User Support Email: select your email address from the options provided.
- App Logo: optionally, you can upload a logo for your app.
Add your email address in the Email addresses field and click SAVE AND CONTINUE.
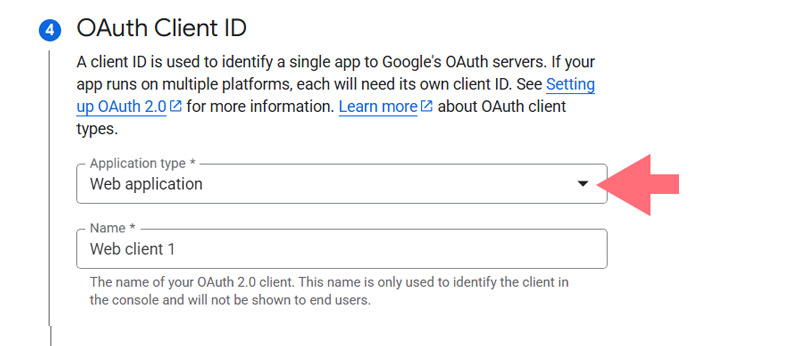
From the Application type dropdown, select Web application. This will populate additional fields.
You can keep the default name or change it as needed (e.g., “Web Client 1”).
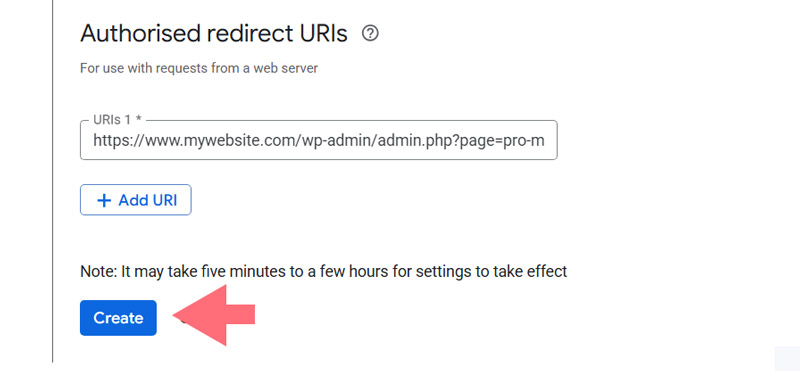
Skip the Authorized JavaScript origins section and go to Authorized redirect URIs.
Click on + ADD URI.
Open the Pro Mail SMTP plugin and go to the Gmail provider setup screen.
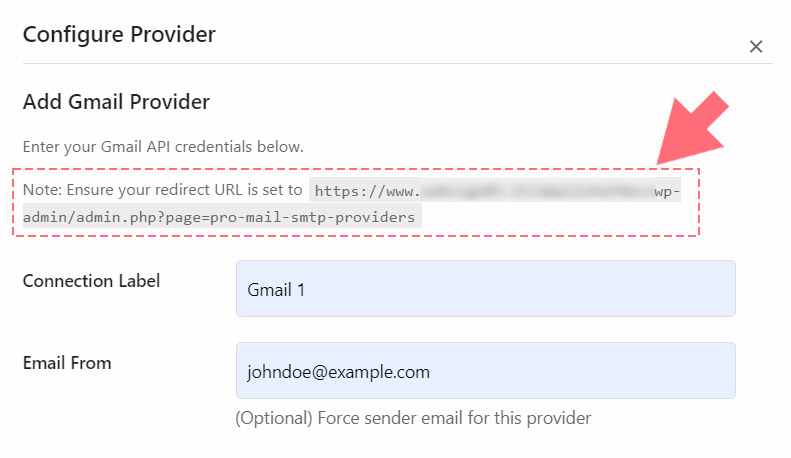
Copy the Redirect URI shown there and paste it into the field.
Click on the CREATE button to finalize this step.
- Finalizing the Setup
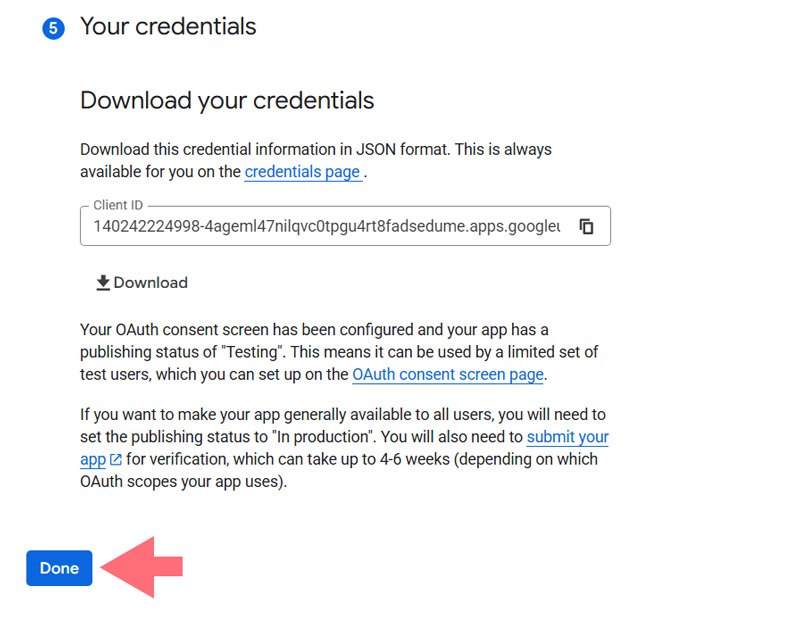
After creating your app, the Your Credentials section will display your Client ID. You can access this later, so there’s no need to copy it now.
Click the DONE button to finish this part of the setup.
- Updating the Publishing Status.
By default, Google will set your app to Internal mode. It is essential to switch it to External mode to ensure it functions correctly.
Navigate to APIs & Services → OAuth consent screen in the sidebar.
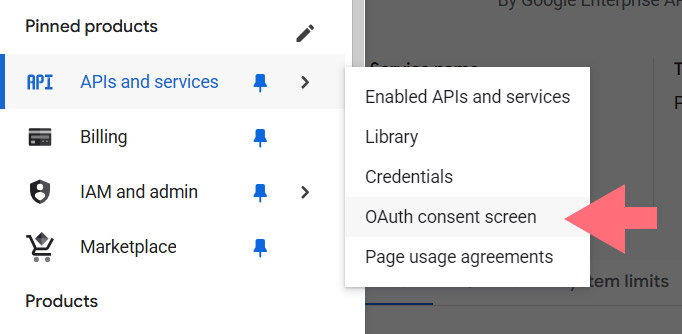
Select the Audience tab. If you are using Google Workspace, click on the MAKE EXTERNAL button under User type.
In the pop-up, choose the In production option and click CONFIRM to complete the process.
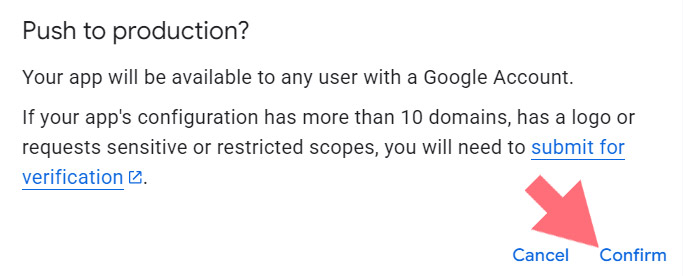
Following these steps will prepare your Google account for integration with Pro Mail SMTP, allowing you to send emails efficiently from your WordPress site.
For Free Gmail Users
If you are using a standard Gmail account instead of Google Workspace, you will not see the option to switch to External mode. Instead, you will need to publish your application to allow it to function properly.
- Publishing Your App.
In the Publishing status section, you will notice that the app is set to Testing. Click on the PUBLISH APP button to change the status.
When prompted, confirm your choice by clicking CONFIRM to finalize the publication of your app. - Checking the Publishing Status.
After publishing, you should see that your app’s status has changed to In production.
Step 3: Granting Permissions for Pro Mail SMTP
Next, you will need to grant the necessary permissions for your site to use Gmail through Pro Mail SMTP.
- Navigate to Credentials.
Go to APIs & Services → Credentials in the left sidebar of your Google Cloud Console.
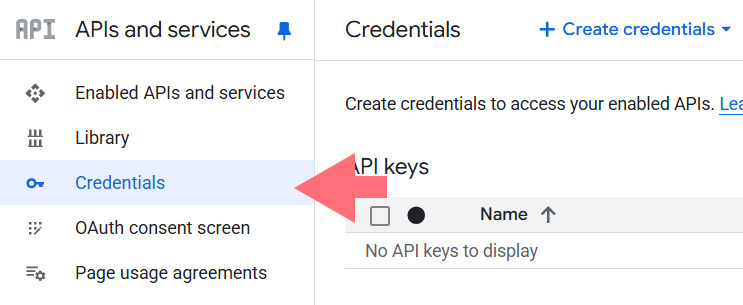
- Locate Your OAuth 2.0 Client IDs.
Under the OAuth 2.0 Client IDs section, find the details for the web application you just created. Click the pencil icon to edit and view the Client ID and Client Secret.

- Copy the Credentials.
Carefully copy both the Client ID and Client Secret into the corresponding fields in your Pro Mail SMTP settings.
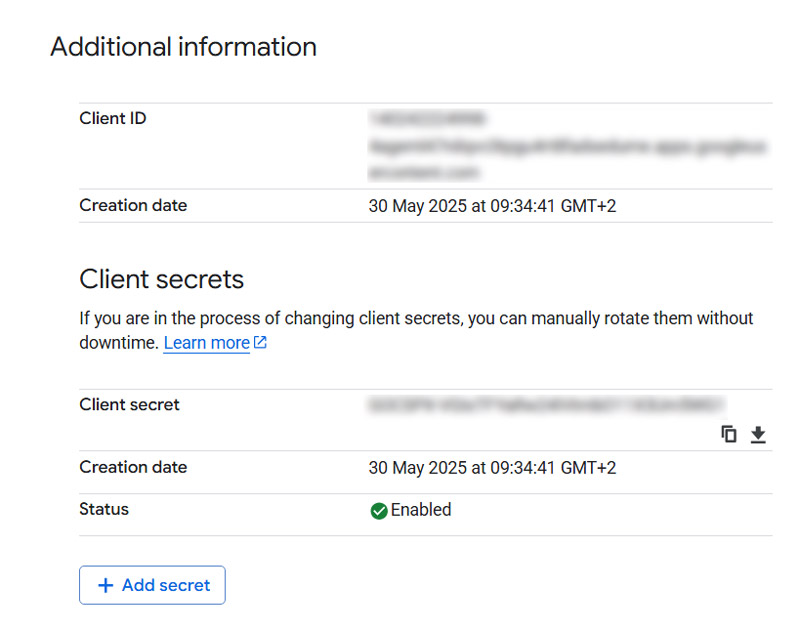
💡Note
Be cautious to avoid copying any extra spaces or text, as this could cause errors during the setup.
Step 4: Configure Pro Mail SMTP
Now that you have your Gmail Credentials, it’s time to configure Pro Mail SMTP to use Gmail for sending emails.
Install the Pro Mail SMTP Plugin
- Log in to Your WordPress Admin Area.
Access your WordPress dashboard by entering your admin credentials. - Navigate to Plugin Installation.
In the left sidebar, go to Plugins → Add New. - Search for Pro Mail SMTP.
In the search bar, type Pro Mail SMTP to locate the plugin. - Open Plugin Settings.
Click on the Install Now button next to the Pro Mail SMTP plugin. Once the installation is complete, click on Activate to enable the plugin. Alternatively, you can manually download the plugin from the official site and upload it to your WordPress installation.
Open Plugin Settings
- Access Pro Mail SMTP Settings.
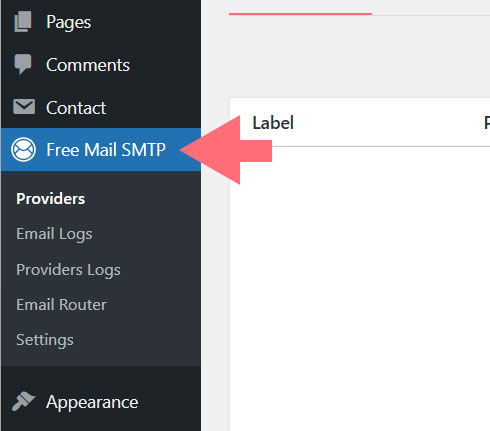
After activation, find Pro Mail SMTP in the left sidebar of your WordPress dashboard and click on it to open the settings.
- Add a New SMTP Provider.
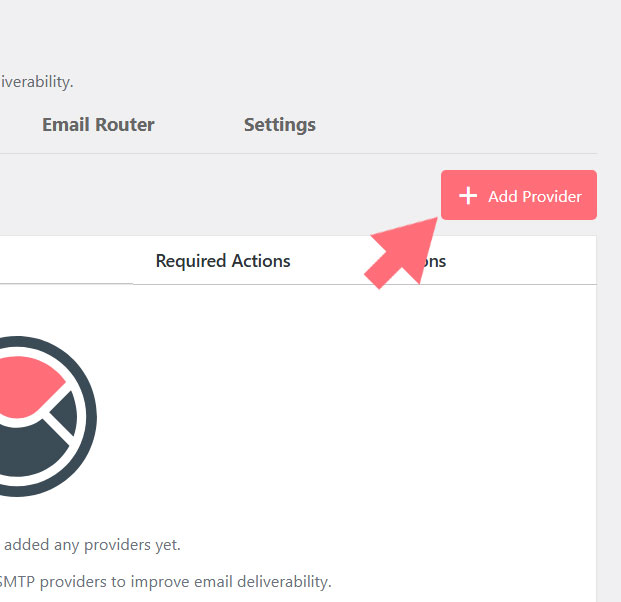
In the Pro Mail SMTP settings, click on the Add Provider button.
- Choose Gmail.
From the list of available SMTP providers, select Gmail.
Enter SMTP Configuration Details
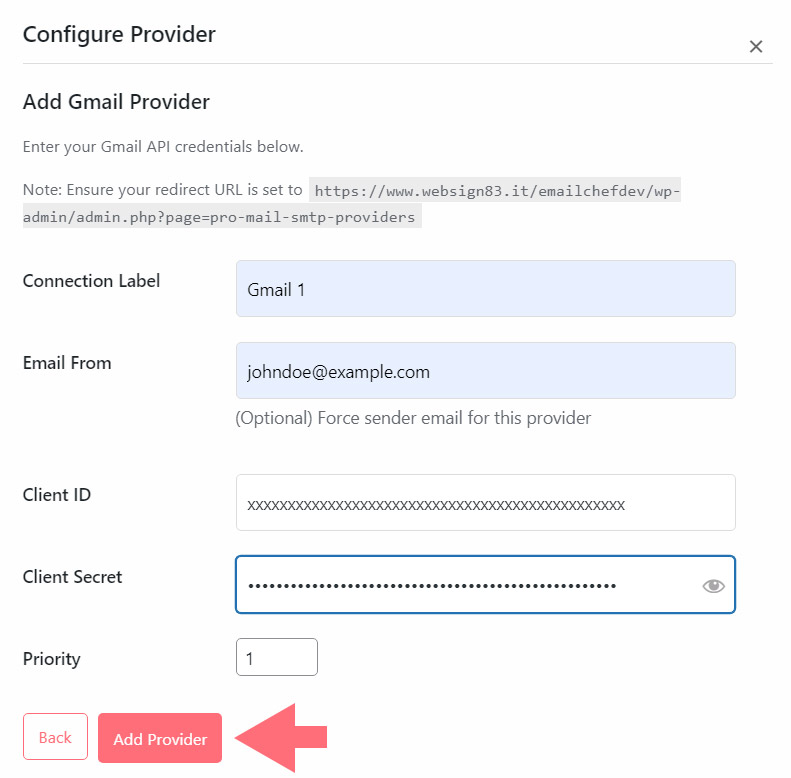
- Connection Label.
Assign a unique name to this connection for easy identification (e.g., Gmail Connection). - Email From (optional).
Specify the email address you wish to use for sending emails (e.g., yourname@gmail.com). This address can overwrite the global email settings for the selected provider.
💡Note
For best results, use a domain-specific email address (e.g., info@yourdomain.com) to enhance deliverability.
- Client ID.
Paste the Client ID you obtained from the Google Cloud Console into this field. This ID is essential for authenticating your connection with Gmail. If you’re unsure where to find it, please proceed to the next step. - Client Secret.
Enter the Client Secret you generated in the Google Cloud Console. This key is necessary for secure communication between your WordPress site and Gmail. If you need help locating it, check the next step. - Priority.
Assign a priority number to this connection. Lower numbers indicate higher priority in the fallback mechanism.
Connect Your Gmail Account
- Click Connect Gmail Account.
After saving, a Connect Gmail Account button will appear next to the provider entry. Click it.

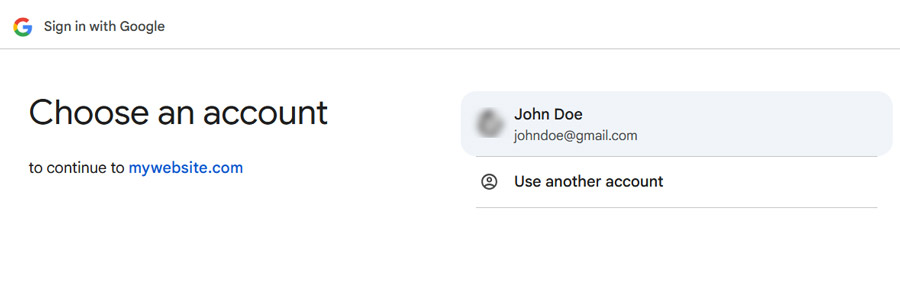
- Sign in with Google.
You’ll be redirected to the Google login page. Choose the Gmail account you want to connect.
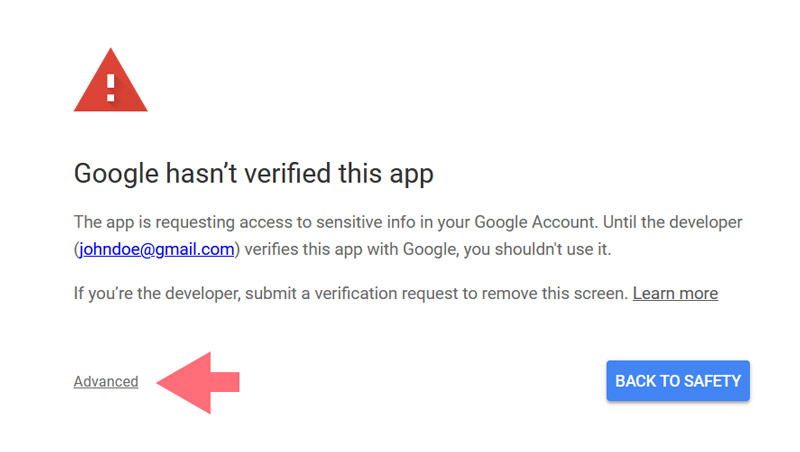
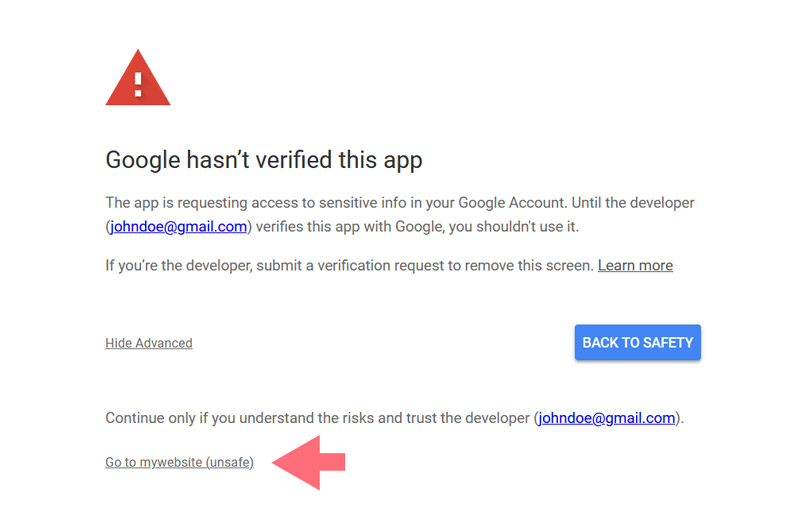
- Handle Security Warning (If Applicable).
If you’re using a free Gmail account, you might see a security warning screen:
– Click Advanced (bottom-left corner).
– Then click Go to [website name] to proceed.
💡Don’t worry
This warning appears only because Google hasn’t verified your app. Since the app is for personal use, verification isn’t required.
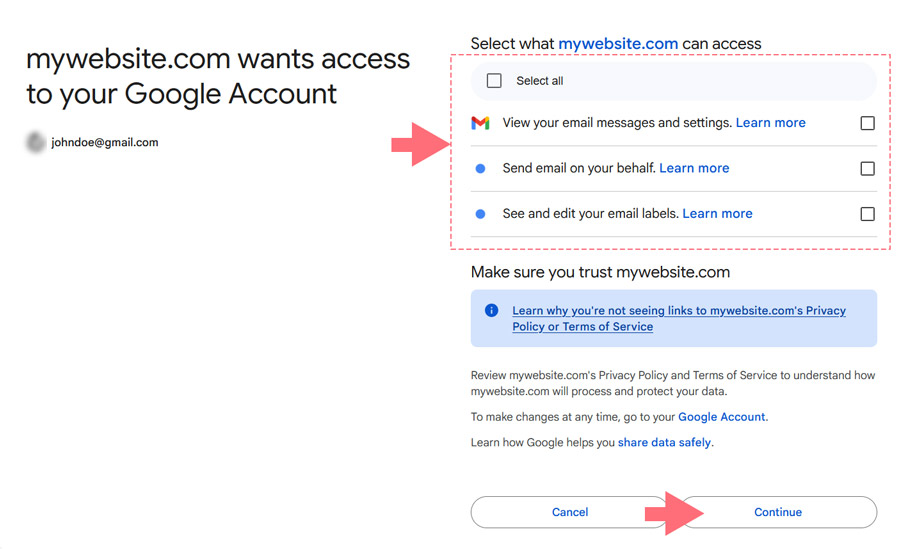
- Grant Permissions.
On the next screen, grant the necessary permissions and click Continue.
Step 5: Save and Test Your Configuration
Return to the Pro Mail SMTP plugin in your WordPress dashboard. Once the connection is complete, you’re ready to run a test.
In the provider settings section, locate and click the Test button.

If the test is successful, your connection with Gmail is all set!
Frequently Asked Questions
How can I send WordPress emails using my Gmail account?
To send WordPress emails using your Gmail account, you can integrate Gmail with an SMTP plugin like Pro Mail SMTP. This ensures authenticated email delivery and reduces the chances of emails going to spam.
Is it safe to connect Gmail to WordPress for sending emails?
Yes, connecting Gmail to WordPress via Pro Mail SMTP is safe. It uses Google’s OAuth 2.0 authentication, ensuring secure and encrypted communication between your site and Gmail.
Why are my WordPress emails not being delivered?
WordPress often uses PHP mail, which lacks authentication. This can cause delivery failures. Using SMTP with Gmail via Pro Mail SMTP ensures proper authentication and improves deliverability.
Can I use a free Gmail account to send WordPress emails?
Yes, you can use a free Gmail account, but there are limitations. Gmail restricts the number of emails sent per day, and you may need to publish your app to bypass Google’s verification warnings.
What is the best SMTP plugin for Gmail and WordPress integration?
Pro Mail SMTP is one of the best SMTP plugins for integrating Gmail with WordPress. It supports Google API authentication, offers fallback email support, and improves delivery success.
Do I need a Google Workspace account to use Gmail SMTP in WordPress?
No, a Google Workspace account is not required. You can use a free Gmail account, though Google Workspace provides higher sending limits and more flexibility for business use.
How do I create Google API credentials for Gmail SMTP?
To create API credentials, go to Google Cloud Console, enable the Gmail API, configure the OAuth consent screen, and generate your Client ID and Client Secret. These are required to authenticate Pro Mail SMTP.
Why is Gmail blocking my WordPress emails?
Gmail may block unauthenticated or suspicious emails. By configuring SMTP with proper credentials and OAuth verification via Pro Mail SMTP, you can prevent emails from being blocked or marked as spam.
What are the Gmail SMTP settings for WordPress?
With Pro Mail SMTP, you don’t manually input SMTP server settings. Instead, you authenticate through Google’s API using your Client ID and Secret, which provides secure and reliable email delivery.
How can I test if Gmail SMTP is working in WordPress?
After setting up Gmail with Pro Mail SMTP, you can run a test email directly from the plugin settings in your WordPress dashboard. A success message confirms the SMTP connection is working properly.