Send Emails Reliably with Outlook and Pro Mail SMTP
Connect your Outlook or Microsoft 365 account to Pro Mail SMTP and gain full control over your email delivery. No more lost messages: just fast, secure, and reliable email from your WordPress site.
INTEGRATE OUTLOOK FOR FREE
How to Configure Pro Mail SMTP with Outlook for Reliable Email Delivery
Pro Mail SMTP allows you to send emails from your WordPress site using your Outlook or Microsoft 365 account. This integration uses modern authentication protocols to ensure secure email delivery and helps you avoid issues like spam filtering or delivery failures.
By connecting Pro Mail SMTP with Outlook, you gain a powerful setup that boosts your email performance, ensures consistent delivery, and enhances engagement—whether you’re sending transactional messages, notifications, or newsletters.
By the end of this guide, you’ll have a fully functional integration between Pro Mail SMTP and Outlook, ensuring your emails are authenticated, trusted, and delivered without interruptions.
What is Outlook?
Outlook is Microsoft’s popular email and calendar service, offered both as a free webmail platform (Outlook.com) and as part of Microsoft 365 for business users. With its clean interface, deep integration with Microsoft Office tools, and enterprise-grade security, Outlook is widely used for both personal and professional email communications.
Users can manage emails, contacts, calendars, and tasks in one unified platform. Outlook also supports advanced features like shared calendars, focused inbox, and automatic email organization through rules and categories.
Key Features:
Cost: Outlook is free to use, but Microsoft requires you to provide credit card details to verify your account.
From Email Requirements: With the free version, you’re limited to using Microsoft-based email addresses such as @outlook.com, @hotmail.com, or accounts tied to Microsoft 365 (Exchange Online).
If you want to send emails from a custom domain (e.g., info@yourdomain.com), you must use a paid Microsoft 365 subscription. Free accounts do not support domain-based sender addresses when using the Outlook API.
Bottom Line: Microsoft’s API offers a secure and cost-effective way to send authenticated emails through your WordPress site. However, the setup process is more technical compared to other mailers, and you may experience brief delays in delivery (typically no more than a couple of minutes).
Step 1: Configure Pro Mail SMTP
Before connecting your Outlook or Microsoft 365 account, you’ll first need to install and set up the Pro Mail SMTP plugin on your WordPress site. This plugin will handle the connection between your site and Microsoft’s secure mail servers.
Install the Pro Mail SMTP Plugin
- Log into your WordPress dashboard.
Use your admin credentials to access the backend of your website. - Go to the Plugins section.
From the left-hand menu, navigate to Plugins → Add New. - Search for Pro Mail SMTP.
Use the search bar to locate the plugin. - Install and activate the plugin.
Click on Install Now, then on Activate once the installation completes.Alternatively, you can download the plugin from the official Pro Mail website and upload it manually via the Upload Plugin option.
Set Up the SMTP Connection
- Open the plugin settings.
After activation, look for Pro Mail SMTP in the WordPress sidebar and click on it.
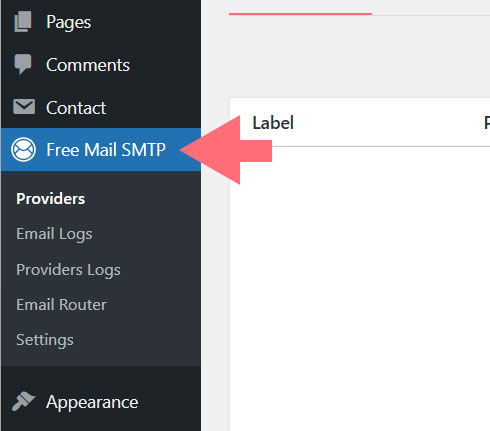
- Add a new SMTP provider.
In the plugin interface, click Add Provider to start the setup.
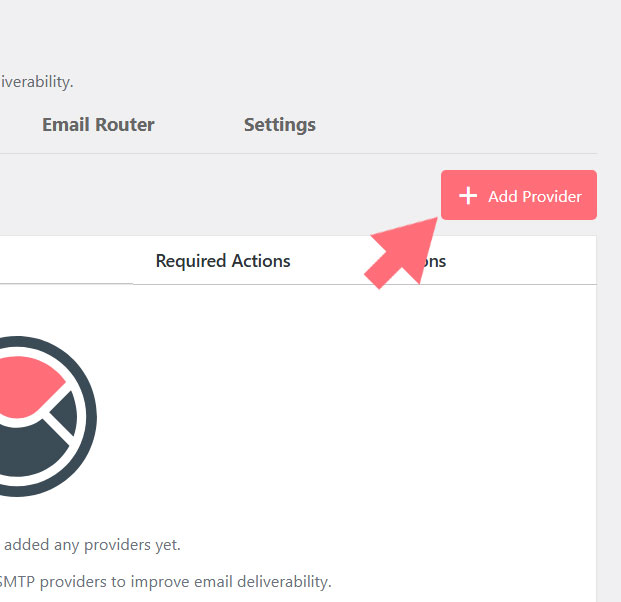
- Select Microsoft Outlook / Office 365.
Choose Outlook (Microsoft 365 / Live / Hotmail) from the list of available SMTP services.
Enter SMTP Configuration Details
- Connection Label.
Give your connection a descriptive name (e.g., Outlook SMTP or Office 365 Connection). - Email From (optional).
Enter the email address you want to use as the sender (e.g., yourname@outlook.com or info@yourdomain.com).
💡Note
To send from a custom domain (e.g., @yourdomain.com), you’ll need a paid Microsoft 365 plan with Exchange Online.
- Client ID & Client Secret.
Leave these fields blank for now. We’ll fill them in once you’ve registered your application in the Azure Portal (see Step 2). - Priority.
assign a priority number to this connection. Lower numbers take precedence if you use multiple SMTP setups.
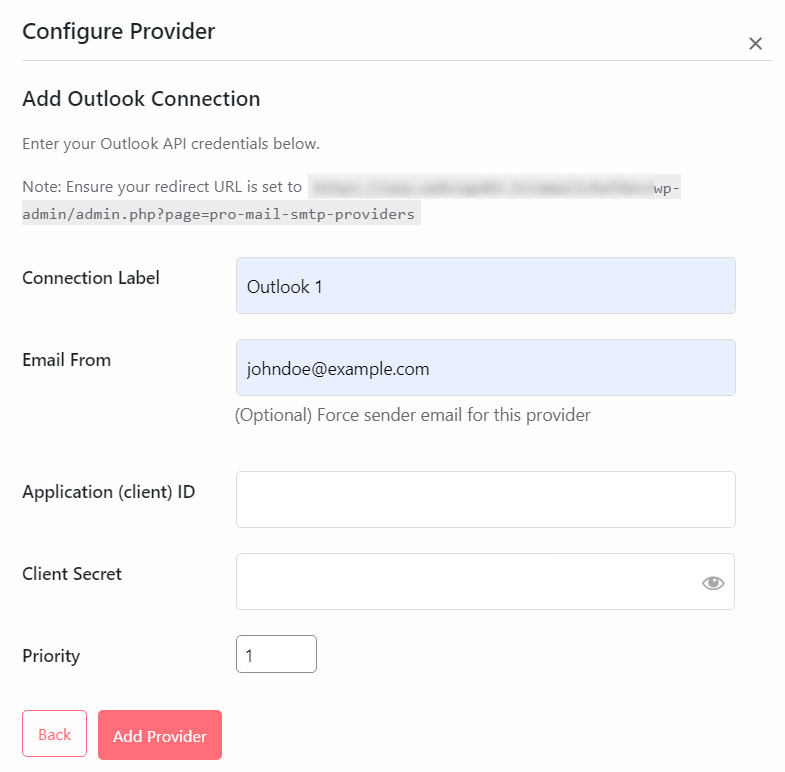
Once you’ve completed this section, you’re ready to move on to registering the Microsoft app that will handle authentication for your Outlook-based email delivery.
Step 2: Set Up Your Microsoft Azure Account
To connect your Outlook or Microsoft 365 email with Pro Mail SMTP, the first step is to configure a Microsoft Azure account. This platform allows you to register the application that will securely authorize your WordPress site to send emails via Microsoft’s API.
If you don’t already have an Azure account, you can create one for free on the Microsoft Azure sign-up page. Note that while there’s no charge for the account itself, Microsoft will ask for your credit card details during the sign-up process as a verification method to reduce fraudulent activity.
⚠️ Important:
You may be prompted to activate the “Pay-As-You-Go” plan in order to access certain features like app registration, even if you don’t intend to use any paid services.
Most users with an existing Microsoft email (such as Outlook.com, Hotmail.com, or a Microsoft 365 address) can log into Azure using their current credentials, no need to create a new email account. Just make sure the address you’re using is eligible to send emails through the Microsoft API.
Once your account is active and verified, head over to the Azure Portal to begin the application setup.
- Register a New Application ID.
In the Azure Portal dashboard, use the search bar at the top and type App registrations.
Select the App registrations service from the search results.
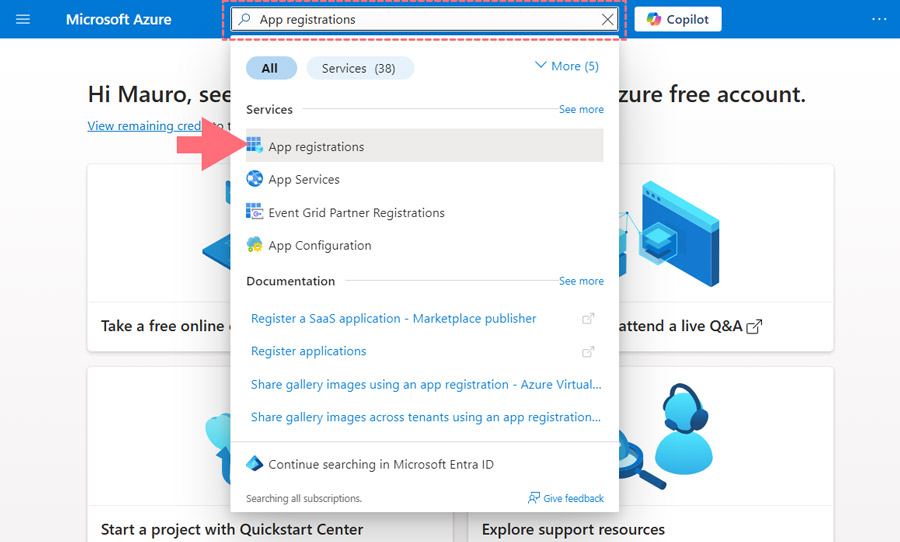
Click the + New registration button at the top of the page to start configuring your app.
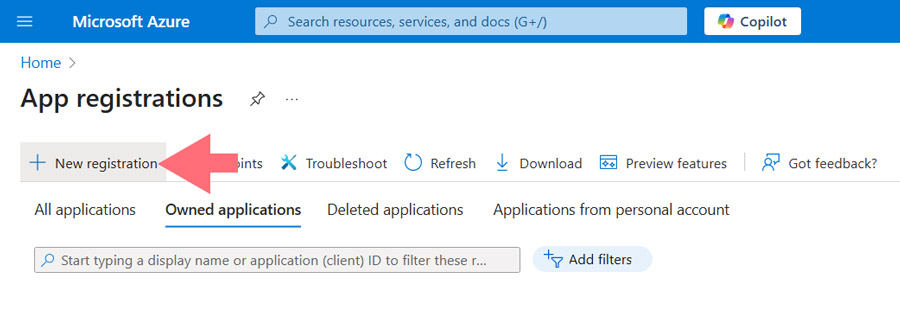
- Fill Out the App Registration Form.
When registering the app, you’ll need to provide the following details:- Name: choose something descriptive, such as Pro Mail SMTP – yourdomain.com. This is just for your internal reference.
- Supported account types: choose Accounts in any organizational directory and personal Microsoft accounts.
If this option isn’t visible, choose the closest available alternative based on your account type (e.g. Any Azure AD – Multitenant). - Redirect URI: set the platform type to Web. In the URI field, enter the Redirect URI provided in your Pro Mail SMTP plugin settings.
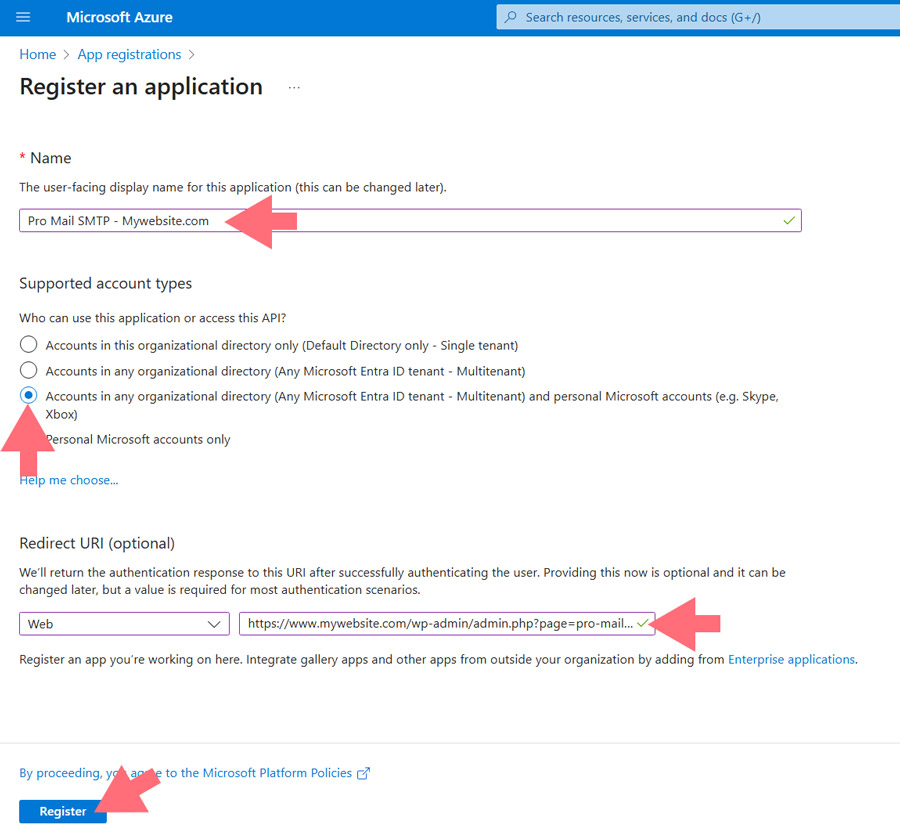
Once all fields are filled out, click Register to create the application. You’ll then be taken to your app’s overview page, where you can proceed with assigning permissions and collecting credentials.
Step 3: Retrieve Your Application ID and Secret
Once you’ve completed the app registration process in Microsoft Azure, it’s time to collect the credentials needed to authorize your Outlook connection in Pro Mail SMTP.
Get Your Application (Client) ID
After submitting the registration form, you’ll be redirected to the Overview page of your app. Here, you’ll see a field labeled Application (client) ID: this is your unique identifier for the integration.
- Copy the entire Application ID.
This value will be used inside the Pro Mail SMTP settings on your WordPress site.
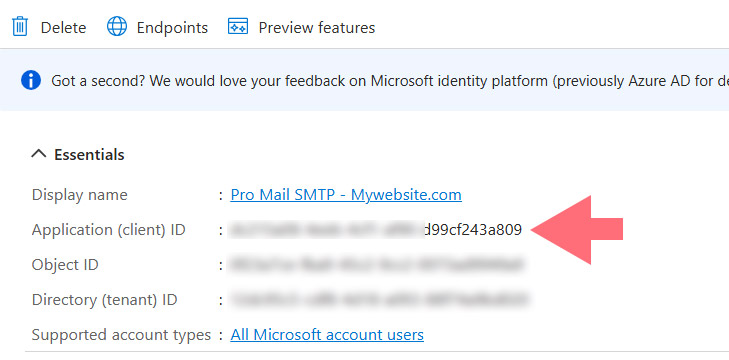
- Paste it into the Application (client) ID field in your Pro Mail SMTP configuration under the Outlook provider setup.
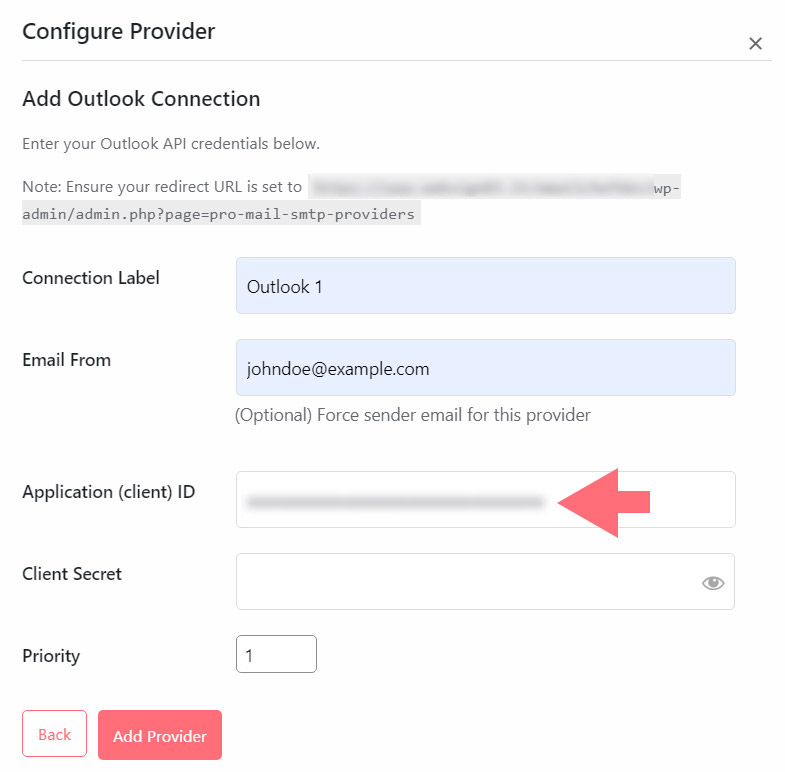
Generate a Client Secret (Client Password)
To enable secure authentication, you’ll also need to create a Client Secret, the password that Pro Mail SMTP will use to authenticate with Microsoft’s servers.
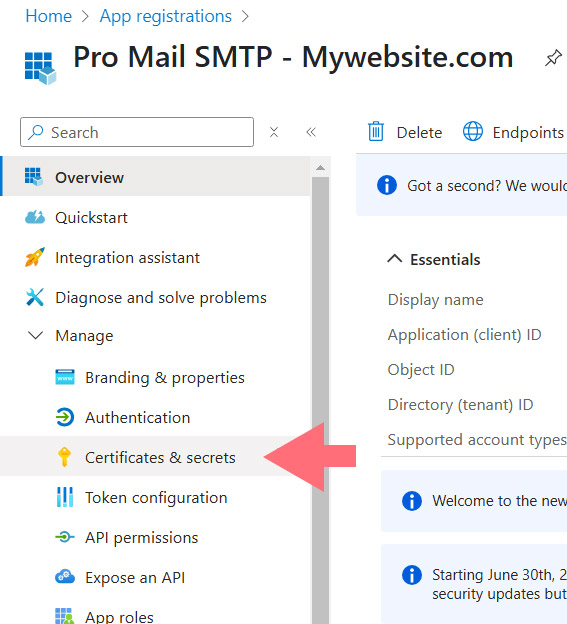
- Open the Certificates & Secrets Section.
In the left-hand menu of your registered app, go to: Manage → Certificates & secrets.
💡Note
If you’re not already in your app’s settings, return to App registrations, click on the app name you just created, and you’ll find this section there.
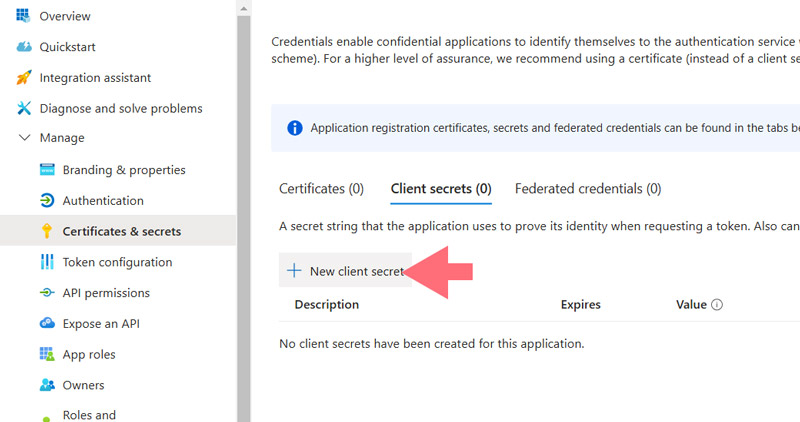
- Add a New Client Secret.
Click on + New client secret.
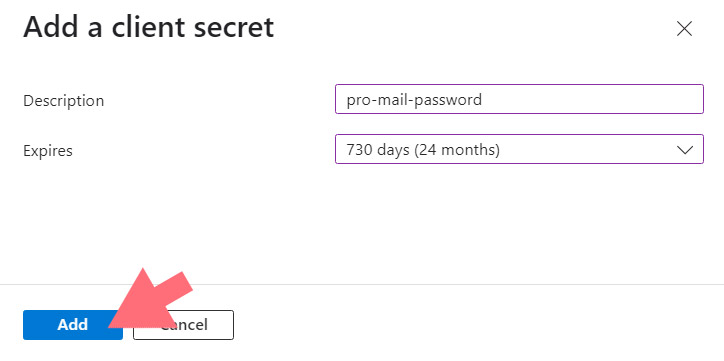
A small form will appear asking for the following details:- Description: choose a clear label (e.g., pro-mail-password) to recognize it later.
- Expires: Select 24 months (730 days) for a long-lasting token.
Then click Add.
Copy and Store the Client Secret
Once the secret is created, Microsoft will display a Value field: this is your application password.
- Copy the Value immediately.
You’ll only see it once. If you leave the page or refresh it, the password will no longer be visible.

💡Note
We strongly recommend saving the password in a secure location such as a password manager.
- Paste the password into the Client Secret field in your Pro Mail SMTP settings.
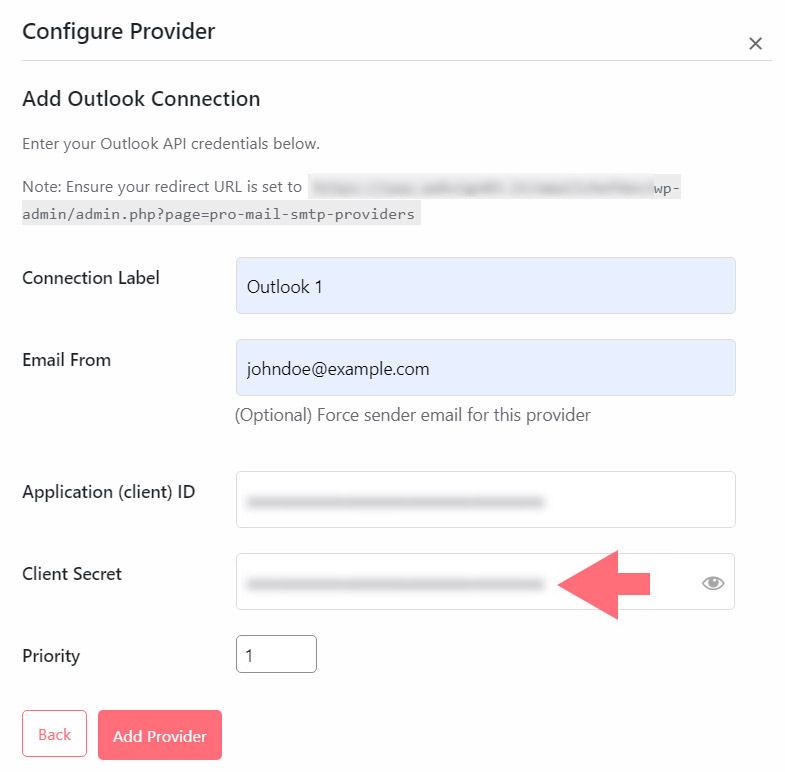
Now both your Client ID and Client Secret are configured in WordPress, and you’re ready to move on to finalizing the integration.
Step 4: Save and Authorize Outlook in Pro Mail SMTP
Now that you’ve entered both the Client ID and Client Secret, it’s time to finalize the connection.
- Save Your Settings.
Scroll to the bottom of the Pro Mail SMTP settings page in your WordPress dashboard and click the Add Provider button.

- Authorize the Plugin to Use Your Microsoft Account.
After saving, a new option will appear in the Authorization section of the page.
Click the button labeled Connect Outlook account.

This action will redirect you to Microsoft’s login and permissions screen.
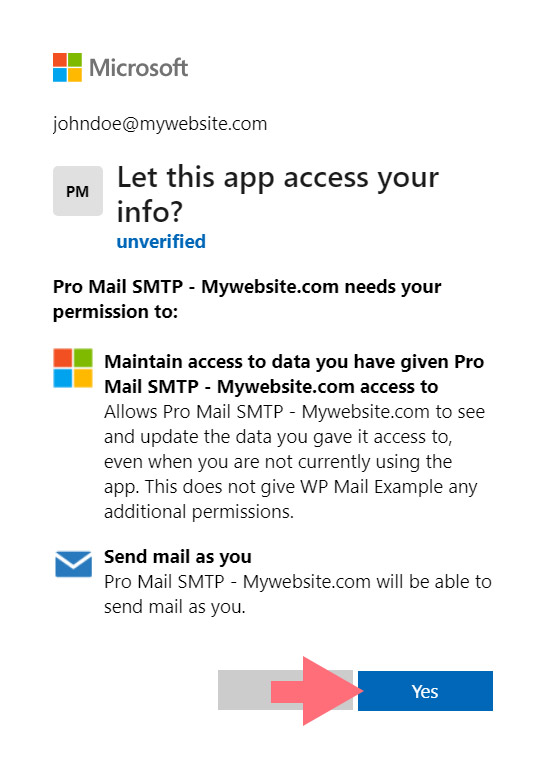
- Grant Permissions to Pro Mail SMTP.
You’ll be taken to a Microsoft page asking you to approve the requested permissions.
Click Yes to confirm and allow Pro Mail SMTP to send emails through your Outlook account.
- Confirmation of Successful Connection.
Once authorization is complete, you’ll be redirected back to your WordPress dashboard.
At the top of the Pro Mail SMTP settings page, you should now see a success message confirming that your Microsoft account is connected.
Step 5: Save and Test Your Configuration
Go back to your WordPress dashboard and open the Pro Mail SMTP settings.
Once the setup is complete, scroll down to the provider section.
There, click the Test button.

If no issues appear, your connection with Outlook is successfully established!
Frequently Asked Questions about Outlook Integration.
How do I connect Outlook to WordPress for reliable email delivery?
You can use the Pro Mail SMTP plugin to connect your Outlook or Microsoft 365 account to WordPress. This ensures your emails are authenticated, secure, and avoid spam filters. The process involves configuring SMTP settings and authorizing access through Microsoft Azure.
Is Outlook SMTP free to use with WordPress?
Yes, you can integrate Outlook for free using a @outlook.com or @hotmail.com address. However, sending emails from a custom domain (e.g., info@yourdomain.com) requires a paid Microsoft 365 subscription with Exchange Online.
What is Pro Mail SMTP and how does it improve email deliverability?
Pro Mail SMTP is a WordPress plugin that routes your site’s emails through trusted SMTP servers like Outlook, ensuring secure, authenticated delivery and reducing the risk of messages being marked as spam or not sent at all.
Can I send WordPress emails using my Microsoft 365 email address?
Absolutely. With Pro Mail SMTP, you can configure your Microsoft 365 (Exchange Online) address to send WordPress emails. You’ll need to register an app in Microsoft Azure to generate the necessary credentials (Client ID and Secret).
How do I create a Microsoft app to use Outlook SMTP with WordPress?
Log in to the Microsoft Azure Portal, go to App registrations, and create a new app. You’ll receive a Client ID and generate a Client Secret, which you’ll enter in your Pro Mail SMTP plugin settings.
Why do I need to use Microsoft Azure to connect Outlook SMTP?
Microsoft requires OAuth 2.0 authentication for third-party apps. Azure allows you to securely register your site and authorize SMTP access using modern authentication protocols, which are safer and more reliable than basic login methods.
Can I use my custom email domain with Outlook SMTP on WordPress?
Yes, but only if you’re using a paid Microsoft 365 plan. Free Outlook accounts do not support custom domain emails when connecting through the API. You’ll need Exchange Online for domain-based sending.
What are the SMTP settings for Outlook in Pro Mail SMTP?
Once Outlook is selected as the provider, you’ll be prompted to enter a Connection Label, From Email, Client ID, and Client Secret. These details authorize and define your SMTP connection with Outlook’s mail servers.
What permissions does Pro Mail SMTP need to access my Microsoft account?
When authorizing the plugin, Microsoft will ask you to grant permissions to send email on your behalf. This includes basic account access and mail-sending privileges, strictly used to improve email deliverability from your WordPress site.
How do I verify if my Outlook SMTP integration is working in WordPress?
After setting up and authorizing the connection in Pro Mail SMTP, return to the plugin settings in WordPress. Scroll to the provider section and use the Verify Configuration or Test button. If no issues appear, your integration is successful.