Set Up SMTP2GO for Efficient Email Delivery
Achieve swift and secure email delivery with SMTP2GO. By integrating it with Pro Mail SMTP, you can enhance your email communication and ensure your messages reach your audience effectively.
START USING SMTP2GO FOR FREE
How to Set Up Pro Mail SMTP with SMTP2GO
SMTP2GO offers a reliable email delivery service designed to ensure that your messages reach their intended recipients efficiently and effectively. With its robust infrastructure and focus on high deliverability rates, SMTP2GO is an excellent choice for businesses looking to improve their email communication.
By integrating SMTP2GO with Pro Mail SMTP, you can streamline your email sending process, reduce the likelihood of emails landing in spam folders, and enhance user engagement through timely and reliable communication. This comprehensive guide will walk you through the essential steps to set up SMTP2GO with Pro Mail SMTP, allowing you to harness the full potential of SMTP2GO’s powerful features. You’ll learn how to configure your account, generate the necessary API key, and properly set up your email settings, ensuring a seamless email delivery experience for your WordPress site.
What is SMTP2GO?
SMTP2GO is a reliable email service provider that specializes in ensuring high deliverability for your emails. Designed for businesses of all sizes, SMTP2GO guarantees that your messages reach their intended recipients quickly and efficiently, making it ideal for both transactional and marketing emails.
With a strong emphasis on performance, SMTP2GO can handle large volumes of email traffic without sacrificing speed or reliability. Their exceptional customer support is available to assist you with any issues or questions, ensuring a smooth email delivery experience.
Features such as real-time tracking, detailed analytics, and comprehensive reporting empower businesses to monitor their email performance and optimize their communication strategies. Overall, SMTP2GO is an excellent choice for enhancing your email delivery processes.
Key Features:
Cost: SMTP2GO offers a free plan that allows you to send up to 1,000 emails per month. Paid plans are available for higher volume needs, starting at $15 per month for 10,000 emails.
From Email Requirements: SMTP2GO works with any email address, including domain-specific addresses (e.g., you@yourdomain.com).
Bottom Line: SMTP2GO is recognized for its reliability and scalability, making it an excellent option for improving email deliverability.
Step 1: Create an SMTP2GO Account
In order to link Pro Mail SMTP to SMTP2GO and begin sending emails, you must first create an account with SMTP2GO. This step is essential to access the SMTP credentials and configuration options.
Creating an SMTP2GO Account
If you haven’t signed up for Postmark yet, here’s how to create your account:
- Visit the SMTP2GO Website.
Go to SMTP2GO.com. - Sign Up for an Account.
Click on the Sign Up button to begin the registration process.

- Choose a Plan.
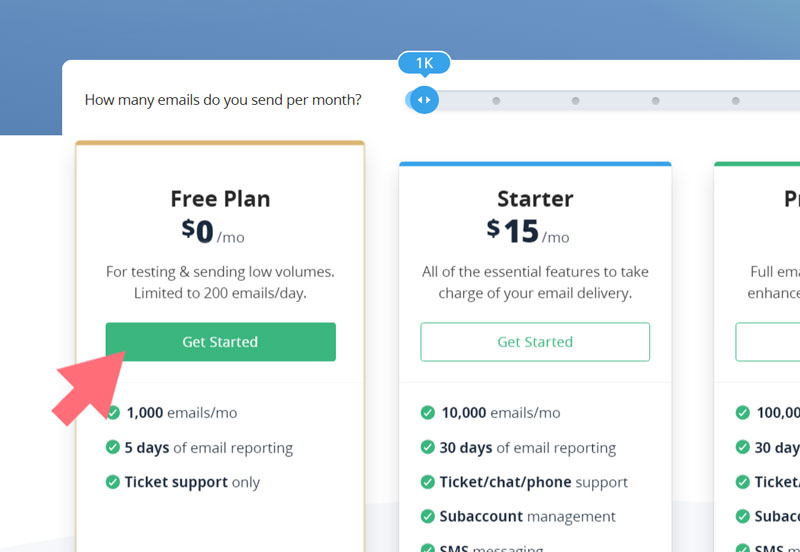
Before proceeding with registration, you’ll need to select one of the available plans based on your needs. SMTP2GO offers both free and paid options.
Select your preferred plan and click on Get Started to continue.
- Enter Your Email Address.
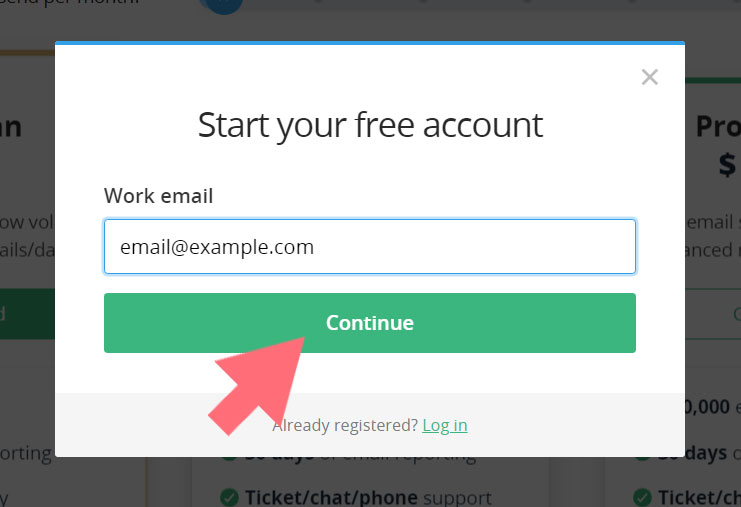
Start by entering the email address you wish to use for registration and click on the Continue button.
- Provide Your Details.
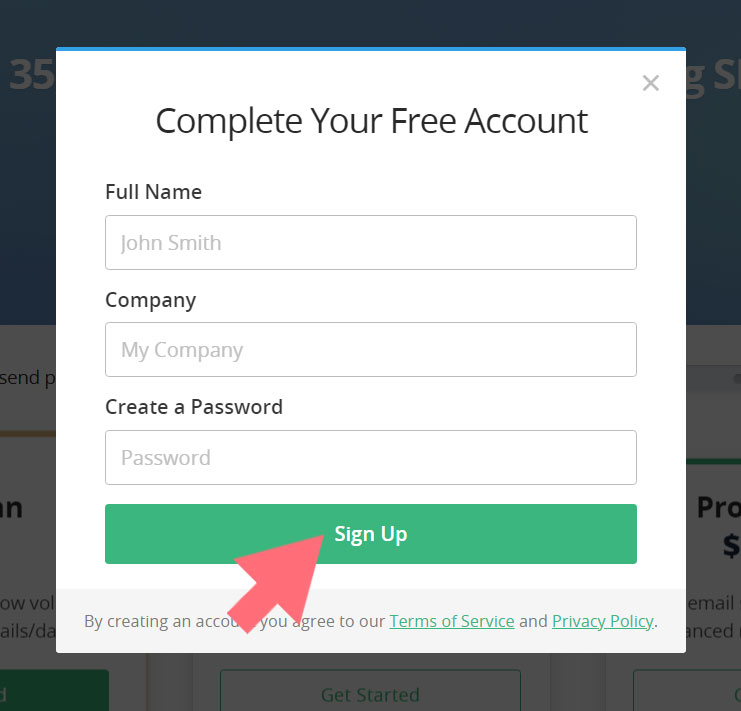
You will then be prompted to enter your name, your company name, and to choose a secure password. Fill in these fields accordingly.
Click on the Sign Up button to finalize your registration.
- Activate Your Account.
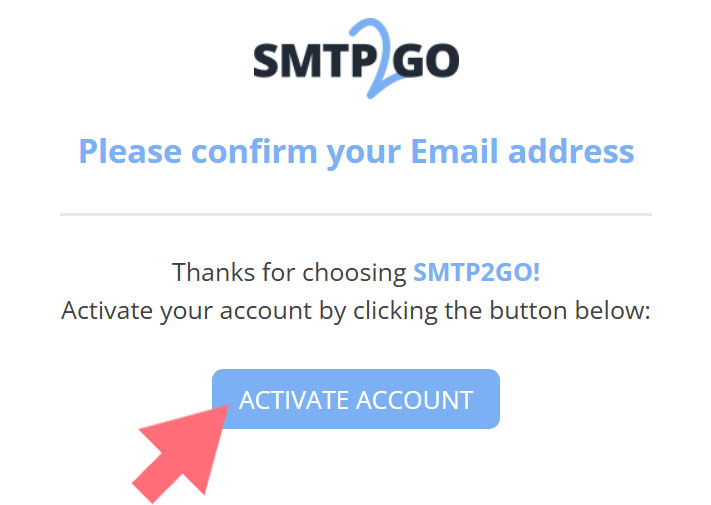
After signing up, a confirmation email will be sent to the address you provided. Open the email and click on the Activate Account link to activate your account.
Step 2: Configure Your SMTP2GO Account
Now that you have created your SMTP2GO account, it’s time to configure the necessary settings to ensure seamless email delivery. This step involves setting up your sender identity and verifying your domain, which are crucial for optimizing your email communication.
Follow the steps below to properly configure your SMTP2GO account and get ready to start sending emails effectively.
Adding Your Verified Sender
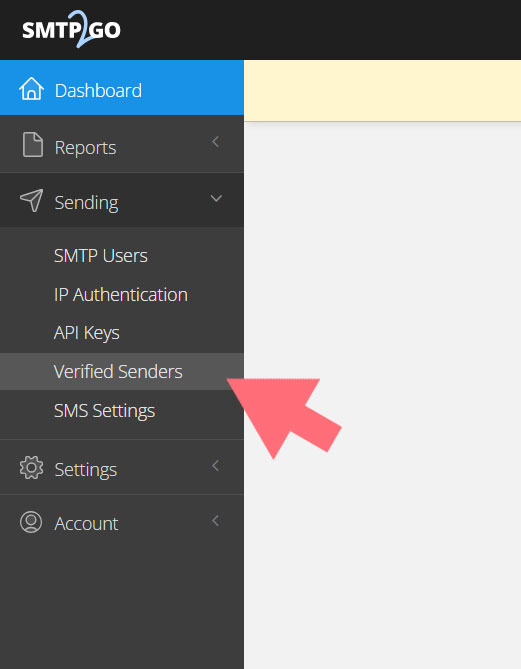
- Navigate to Verified Senders.
In your SMTP2GO dashboard, go to Sending and then select Verified Senders.
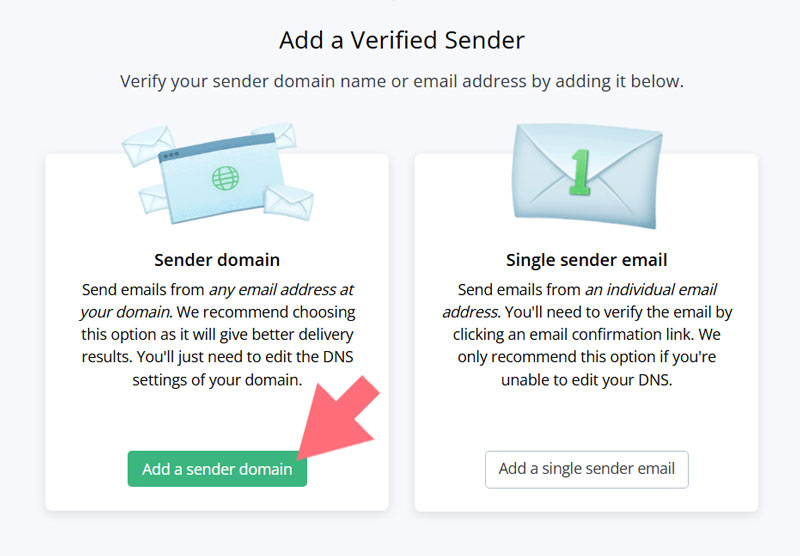
- Add a New Sender.
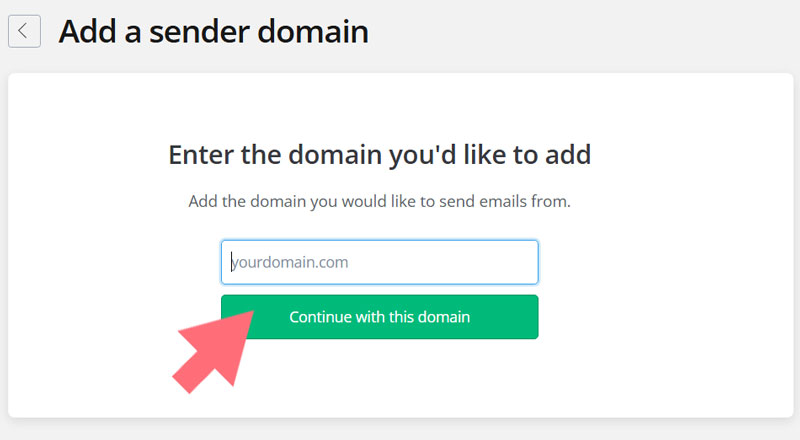
Click on the Add a Sender Domain button. Enter the email address you want to use for sending emails and complete any required fields. Once you’re done, click on the Continue with this domain button.
Adding DNS Records.
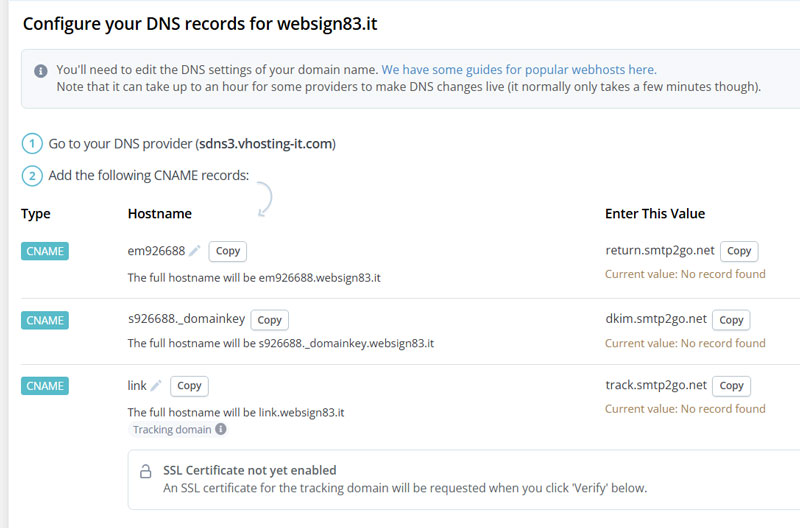
After confirming your domain, SMTP2GO will provide you with three CNAME records that you need to add to your domain’s DNS settings. This process of authorizing your domain by adding these records is crucial for ensuring reliable email delivery.
- Access Your DNS Settings.
Open a new browser tab and log in to the service where you purchased your domain (usually your hosting provider). Locate the DNS settings for your domain.
💡Note
If you’re unsure how to find your DNS settings or feel uncomfortable making changes, please reach out to your hosting provider for assistance.
- Add the CNAME Records.
In your DNS settings, look for an option to add a new record. Carefully copy and paste the three CNAME records provided by SMTP2GO, as the exact values are necessary for successful verification.
Verifying Your DNS Records.
- Check Propagation Time.
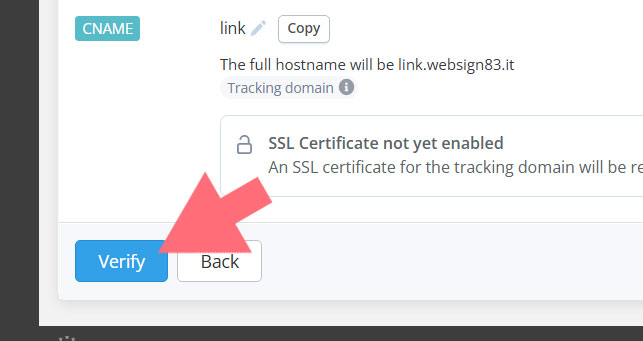
After adding the DNS records, it can take up to 24-48 hours for the changes to propagate and for SMTP2GO to verify them. However, in some cases, verification can occur much more quickly. - Click the Verify Button.
You can attempt to verify your records by clicking the Verify button in your SMTP2GO dashboard as a quick test.
- Continue with Setup.
There’s no need to wait for the verification to complete before moving on to the next step. You can continue with the setup process while waiting for the verification status. Just keep this tab open for future reference.
Once your domain has been successfully verified, you will see confirmation messages indicating that your sender identity is ready for use.
Step 3: Generate Your SMTP2GO API Key
To successfully connect Pro Mail SMTP with SMTP2GO, you will need to generate an API key. This API key is essential for authenticating your requests to SMTP2GO’s email delivery service, ensuring that your emails are sent securely and efficiently.
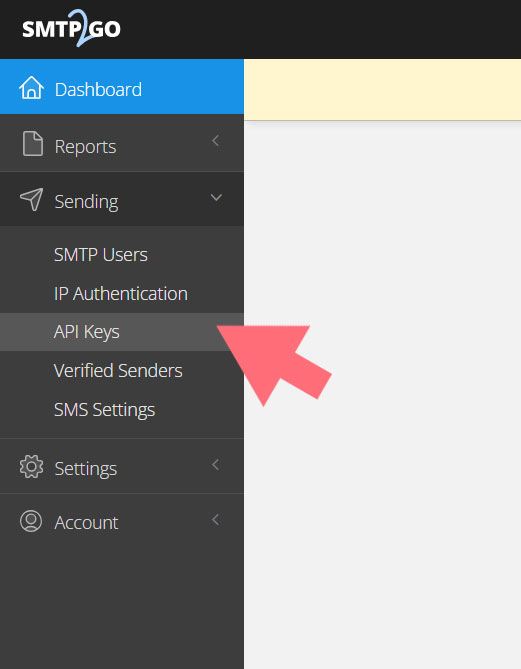
- Access API Keys.
In your SMTP2GO dashboard, navigate to Sending and then click on API Keys.
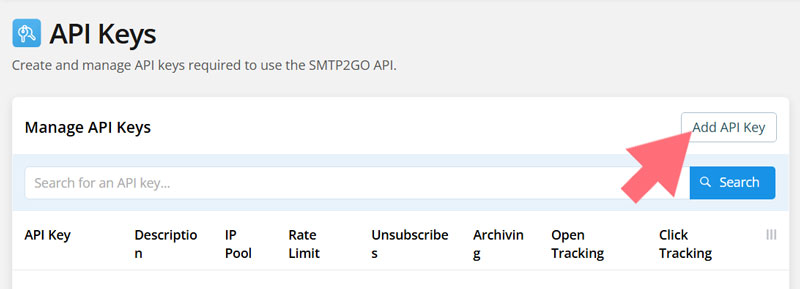
- Create a New API Key.
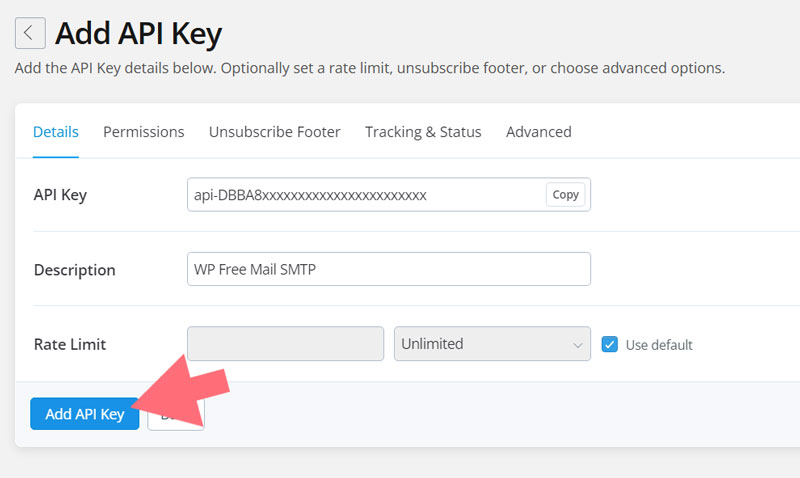
To create a new API key, select the Add API Key option. A pop-up will appear showing various settings. The API Key field will be automatically filled with a generated key. In the Description field, provide a name that clearly identifies the key’s purpose (e.g., “Pro Mail SMTP Integration”).
Unless you need a custom limit, you can leave the Rate Limit as Unlimited and check the Use default option.
Once everything is set, click Save to finalize the creation of your API key.
- Copy Your API Key.
Once the key is generated, copy it immediately, as you will need it for the Pro Mail SMTP configuration.

Step 4: Set Up Pro Mail SMTP with SMTP2GO.
With your SMTP2GO account ready, the next step is to configure Pro Mail SMTP to send emails using SMTP2GO. Just follow the instructions below:
Install Pro Mail SMTP Plugin.
- Log in to Your WordPress Admin Area.
Access your WordPress dashboard. - Navigate to Plugin Installation.
Go to Plugins → Add New. - Search for Pro Mail SMTP.
In the search bar, type Pro Mail SMTP. - Install the Plugin.
Click on the Install Now button next to the plugin, and then activate it once the installation is complete.
Alternatively, you can download the plugin manually from the official website and upload it to your site.
Open the Plugin Settings.
- Access Pro Mail SMTP Settings.
After activation, find Pro Mail SMTP in the left sidebar of your WordPress dashboard and click on it.
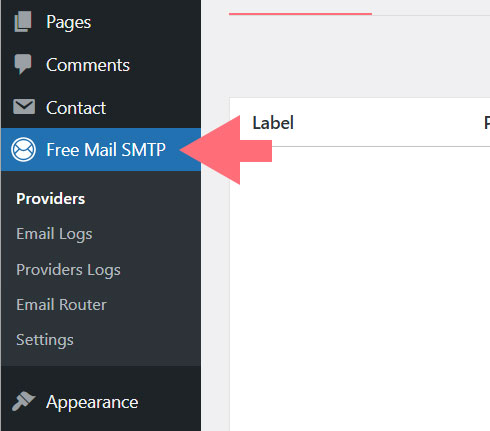
- Add a New SMTP Provider.
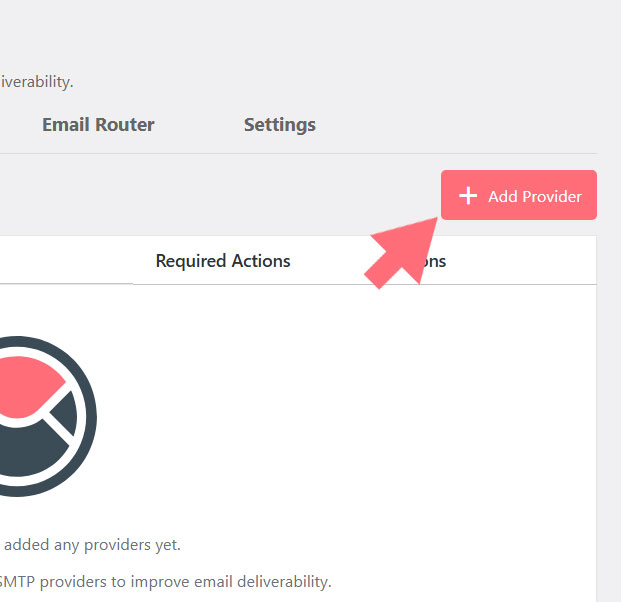
In the Pro Mail SMTP settings, click on the Add New button. From the list of available SMTP providers, choose SMTP2GO.
Enter SMTP Configuration Details
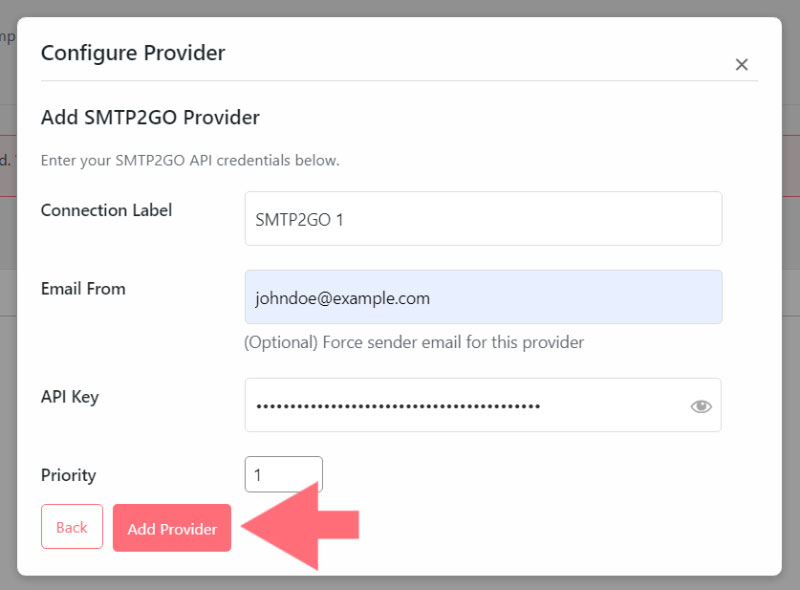
- Connection Label.
Give this connection a custom name to help you recognize it easily (e.g., “SMTP2GO Setup”). - Email From (optional).
Enter the email address you’d like to use as the sender (e.g., noreply@example.com). This can override your default email settings for this provider.
💡Tip
To improve email deliverability, it’s recommended to use an address tied to your domain (e.g., info@example.com).
- API Key.
Paste the SMTP2GO API key you generated earlier into this field. It’s required to securely authenticate with SMTP2GO. - Priority.
Set a priority level for this connection. Lower values will be used first if multiple connections are available.
Step 5: Save and Test Your Configuration
After filling in all the necessary information, click Save Settings to store your configuration.
Then, in the SMTP provider settings section of the Pro Mail SMTP plugin, look for the Test button.
Run a test to confirm everything is working properly.
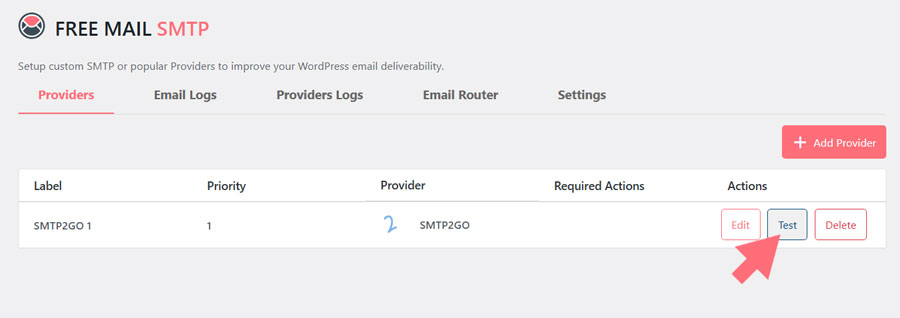
If the test completes without issues, your SMTP2GO configuration is ready to use.
Frequently Asked Questions about SMTP2GO Integration.
What is SMTP2GO and how does it improve email deliverability?
SMTP2GO is a cloud-based SMTP service that helps ensure your emails reach recipients’ inboxes by improving deliverability, avoiding spam filters, and offering tools like analytics and domain verification.
How do I set up SMTP2GO with Pro Mail SMTP on WordPress?
To set up SMTP2GO with Pro Mail SMTP, you need to create an SMTP2GO account, verify your sender domain, generate an API key, and configure the Pro Mail SMTP plugin on your WordPress site with the provided SMTP2GO credentials.
Is SMTP2GO compatible with any email address?
Yes, SMTP2GO supports sending from any valid email address, including personal emails and domain-specific addresses like yourname@yourdomain.com.
Do I need to verify my domain to use SMTP2GO?
Yes, verifying your domain is a recommended step to improve email deliverability and build trust. This involves adding CNAME records to your DNS as provided by SMTP2GO.
Can I use SMTP2GO for free?
SMTP2GO offers a free plan that includes up to 1,000 emails per month, making it ideal for small websites or testing purposes. Paid plans are available for higher volumes.
How do I generate an API key in SMTP2GO?
To generate an API key, log into your SMTP2GO dashboard, go to Sending → API Keys, click Add API Key, name it, and save. Copy and store the key safely for use in your email configuration.
Why are my emails going to spam even with SMTP2GO?
If your emails still land in spam, ensure you’ve verified your domain, are using a domain-based sender address, and your message content avoids spam triggers. SMTP2GO helps, but configuration matters too.
What are the SMTP settings for SMTP2GO?
SMTP2GO typically uses the following settings:
– Username: Your SMTP2GO credentials or API key
– SMTP server: mail.smtp2go.com
– Port: 587 (TLS), 465 (SSL), or 25
– Authentication: Yes
How long does DNS verification take in SMTP2GO?
DNS record propagation usually takes between 24–48 hours, but it can sometimes be verified within minutes. You can check status in your SMTP2GO dashboard.
Can I check if SMTP2GO is working before sending real emails?
Yes, after saving your configuration in the Pro Mail SMTP plugin, you can use the built-in Test button in the SMTP provider settings to confirm that your SMTP2GO setup is correctly configured.